94speedster
Full Access Member
- Joined
- Jun 3, 2011
- Posts
- 98
- Reaction score
- 46
I know there has been some debate on the "DIY" Oil change for the LR4, so I wanted to pass along a "how to" with pictures. Honestly, this is the EASIEST oil change that I have ever done on a car. It took all of 20 minutes, and that could be cut down to 10-15 the second time... I like to change synthetic oil ever 7500 miles, and the LR dealer charges $195 for that priviledge. Below, my total cost was $202 for everything, and the next time I change the oil, I will only need to spend $105 on oil & filter (savings of $90 for 15 minutes of effort!)
What you need: (total parts & consumables cost of $202)
1) 8 quarts of Castrol SLX 5w-20. This is the formulation for the Jaguar 5.0L engine, and can be purchased from Jaguar or Land Rover Dealers. My local Jag dealer was the cheapest at $9.95/qt.
2) Jaguar/Land Rover Oil Filter, Part #W0133-1891127. They are the same filter, but for some reason the Jag filter is cheaper! I paid $25 at the Jag dealer, and Land Rover tried to charge me $48!
3) Oil Filter Wrench - You will need to buy a "90mm, 15 flute" wrench. I picked mine up off Ebay for $2.99 ($7 total with shipping) from this vendor (http://www.ebay.com/itm/CTA-Tools-A..._Automotive_Tools&vxp=mtr&hash=item2c5f4b1535)
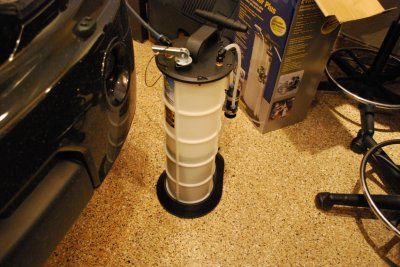
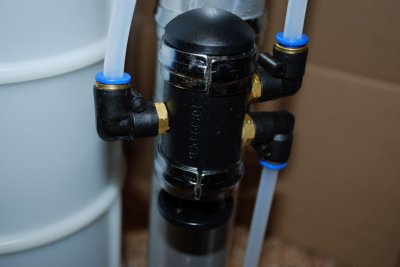
4) Mity Vac 7201 - $90 at Amazon (http://www.amazon.com/Mityvac-7201-Fluid-Evacuator-Plus/dp/B0002SR7TC), free shipping and no tax. NOTE: The 7201 has a hand pump, whereas the 7400 has a pneumatic pump (needs external compressor). I think 99% of us would want the hand pump!
Steps (including pictures):
1) Raise the hood of the LR4
2) Find the big plastic cover over the center of the engine. You can lift the front up, and remove by pulling forward. It is connected in the back with two rubber grommets which act like hinges. Just tug forwardly slightly to remove.
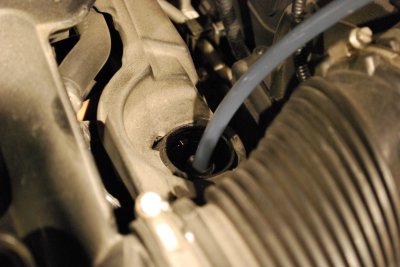
3) Look for the Oil filter (on the left side of the engine under the removed cover -LIGHT GREY housing ) and the oil reservior (on the right side of the engine under the removed cover - BLACK cap with YELLOW lettering)
4) REMOVE the BLACK CAP with yellow lettering, and place aside. Grab the Mityvac (their directions are okay) and position it on the ground close to the oil reservior. Inside the oil reservior is a smaller inner tube positioned almost perfectly in the center. This is the tube to which you will connect your large plastic hose from the Mityvac. Just put that big Mityvac tube (plastic) over this inner tube (metal) (see PIC)
.JPG")
.JPG")
.JPG")
.JPG")
.JPG")
What you need: (total parts & consumables cost of $202)
1) 8 quarts of Castrol SLX 5w-20. This is the formulation for the Jaguar 5.0L engine, and can be purchased from Jaguar or Land Rover Dealers. My local Jag dealer was the cheapest at $9.95/qt.
2) Jaguar/Land Rover Oil Filter, Part #W0133-1891127. They are the same filter, but for some reason the Jag filter is cheaper! I paid $25 at the Jag dealer, and Land Rover tried to charge me $48!
3) Oil Filter Wrench - You will need to buy a "90mm, 15 flute" wrench. I picked mine up off Ebay for $2.99 ($7 total with shipping) from this vendor (http://www.ebay.com/itm/CTA-Tools-A..._Automotive_Tools&vxp=mtr&hash=item2c5f4b1535)
4) Mity Vac 7201 - $90 at Amazon (http://www.amazon.com/Mityvac-7201-Fluid-Evacuator-Plus/dp/B0002SR7TC), free shipping and no tax. NOTE: The 7201 has a hand pump, whereas the 7400 has a pneumatic pump (needs external compressor). I think 99% of us would want the hand pump!
Steps (including pictures):
1) Raise the hood of the LR4
2) Find the big plastic cover over the center of the engine. You can lift the front up, and remove by pulling forward. It is connected in the back with two rubber grommets which act like hinges. Just tug forwardly slightly to remove.
3) Look for the Oil filter (on the left side of the engine under the removed cover -LIGHT GREY housing ) and the oil reservior (on the right side of the engine under the removed cover - BLACK cap with YELLOW lettering)
4) REMOVE the BLACK CAP with yellow lettering, and place aside. Grab the Mityvac (their directions are okay) and position it on the ground close to the oil reservior. Inside the oil reservior is a smaller inner tube positioned almost perfectly in the center. This is the tube to which you will connect your large plastic hose from the Mityvac. Just put that big Mityvac tube (plastic) over this inner tube (metal) (see PIC)
Last edited: