LOCKDOWN To do List

Disclaimer: Links on this page pointing to Amazon, eBay and other sites may include affiliate code. If you click them and make a purchase, we may earn a small commission.

Ruper

Full Access Member
Joined
Jun 16, 2019
Posts
132
Reaction score
30
Location
Chesapeake, VA
So I have done the cornering light mod, and will be rebuilding my air valves next. Also have to refurb my third brake light, did the headlights refurb.
Also looked at some DRL's but I didn't like the look after I split and placed the DRL LED strips, so I bailed and just did the corner lights.

What is on everyone else's list to do during the lock down?

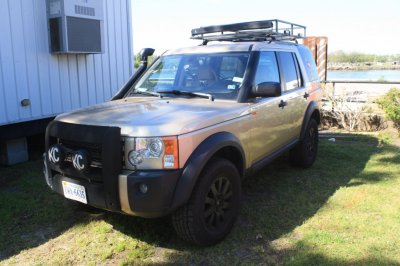
So far I'm here with my Girl... IMG_1239.JPG
 

Houm_WA

Full Access Member
Joined
Jan 6, 2006
Posts
3,938
Reaction score
256
On my wife's 2006:

1. Door lock actuator.
2. A-Pillar trim and windshield cowl re-furb.
3. Heated seat element R&R.
 

Ruper

Full Access Member
Joined
Jun 16, 2019
Posts
132
Reaction score
30
Location
Chesapeake, VA
So this afternoon I came home to everyone's favorite thing in my mailbox...An Amazon pkg. It was the tint I had ordered from them for the headlights and tail lights. Unfortunately is was a Dark Smoke and I wanted Light smoke for my tinting. Called the supplier and explained I had opened one package and to m surprise he told me to keep it and they would send the ordered item. Wow thanks, so I had a 2 free rolls of tint to practice with. As my vehicle is due for inspection in July, and I will need to remove the tint to pass that, it was a win win. So I got to it this afternoon. Results will look good going 70 mpg down the road, but there were so mistakes made, oh well first, it didn't go too bad. I even took on the little side running lights, why not.
Bonus about the virus shutdown no cop will probably pull me for a "Fix It ticket". And yes I am aware that this is not legal, but what is anymore.

Houm WA, did you also go ahead and buy a new seat cushion for your seat R & R. I did mine and it wasn't too bad. I was riding on the rails so I had to do the seat. I cut some foam off the old cushion and added it to the sides for a better "Bucket". Only tip I have it get some Zip ties to help bring the cushion cover close enough to use the hog rings, but maybe that was because I had an extra puffy cushion. There's a video somewhere that I used for the extra cushion idea, that wasn't mine but I did it and it worked great. Good Luck, if you want I will try to find the video, but its pretty straight forward, little tricky getting all the right holes and bars setup right.

Shade 1.jpg


Shade 2.jpg


shade 3.jpg


Shade 4.jpg
 

Ruper

Full Access Member
Joined
Jun 16, 2019
Posts
132
Reaction score
30
Location
Chesapeake, VA
I think I need to now paint the grill black! The headlights were definitely a challenge.
 

Houm_WA

Full Access Member
Joined
Jan 6, 2006
Posts
3,938
Reaction score
256
I think the blackout you did looks pretty sweet for that color LR3. Nice job practicing! My LR3s are both black, so I'm going to stick with stock on that. I actually really like the tail lamps being so big, prominent and bright red against the black paint.

I didn't get a new cushion, but you know, that would be a GREAT idea since my driver's side one is pretty tore up anyway if the price is right. Zip ties....good call! I figure otherwise I will get a hog ring in each corner initially, then work it such that I'm alternating sides every few rings so that I don't end up with a lot of tension for the last few rings.

I am fully prepared for what a PITA that is going to be. I have bought all the tools I need....Torx sockets, a new ratchet, the element of course, Hog Ring Pliers....tomorrow I'm going to get a set of snips and a box of the hog rings from LR so I'm sure to have the correct size. I have a video for seat and cushion removal but not for the cover, so if you have one, I'd appreciate that. Thanks in advance.

Speaking of practice, it's kind of nice to have two LR3s only one year apart. If I have a job to do on both of them, I do it on the '06 first...the '05 is my baby.
 

Ruper

Full Access Member
Joined
Jun 16, 2019
Posts
132
Reaction score
30
Location
Chesapeake, VA
I'll look to see if I can find the video, it was one of those things that I ran across in an unusual place, so.. the cushion I got off Ebay I think it was resonably priced from what I rememebr at least resonably priced in that I nbeeded it real bad.
 

Houm_WA

Full Access Member
Joined
Jan 6, 2006
Posts
3,938
Reaction score
256
Thanks...mine feels okay, I guess I'll know more when I take the cover off.
 

Ruper

Full Access Member
Joined
Jun 16, 2019
Posts
132
Reaction score
30
Location
Chesapeake, VA
Houm I was never able to find the instructions I was looking for. If you don't have too many passenger's riding with you, you could always flip flop the passenger and driver's side bottom seat cushions. My understanding is that the bottom seat cushions are the same in either seat.
 

Ruper

Full Access Member
Joined
Jun 16, 2019
Posts
132
Reaction score
30
Location
Chesapeake, VA
So now about a week into having tinted lights and I found out a couple things:
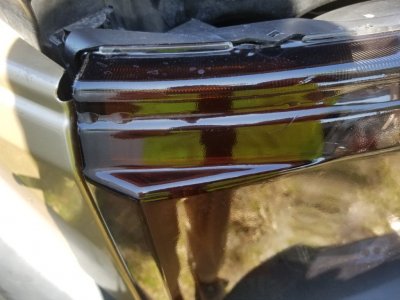
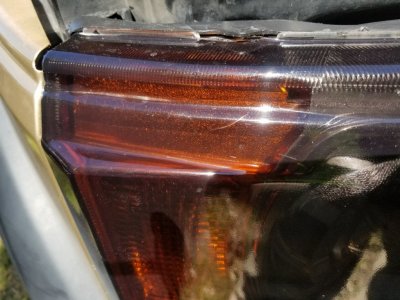
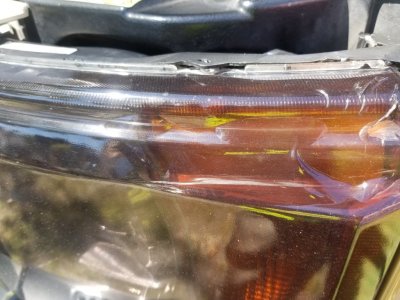
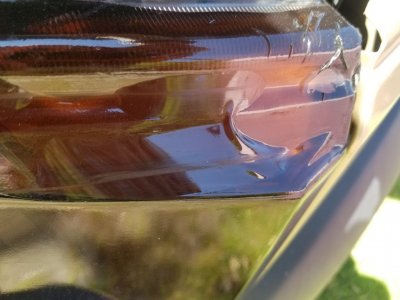
1. When I did my headlights I went about it two ways, first full wrap with heat and no relief cuts on the drivers side. This has not held up well. I am sure it was my fault as the drivers was the first light I did ever.
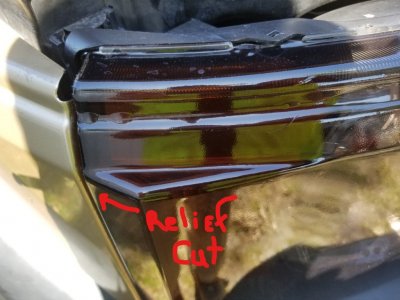
2. A relief cut may be needed for the longevity of the tint.

My drivers side has started to release on the top outer corner where the most tension is as there are multiple angles to navigate. On the pass side I decided to make a small cut about half way of the complex angle on the outer HL top where it is a different angle than the top of the light/face of the HL.
When I do this with the lighter tint I will be making a cut along that outer angle as the tint stayed in place better and the lap of the cut is really rather invisible unless up close.
D corner 2.jpg drivers corner.jpg Pass side corner.jpg
Pass side corner2.jpg

InkedRelief Cut_LI.jpg

First two are the Drivers side upper corner
Next two are the passenger side with the relief cut.
As you can see the drivers side is a mess, not sure if it was me trying to do too much or me not doing it right.
The passenger side relief cut was made on the upper/outer corner as it wrapped toward the rear of the vehicle. if you look closely you can just see where the wrap is doubled up at that corner. The face of the wrap was not cut, just where the corner which protrudes out was going toward the back on that upper corner, if that makes sense. The material seals or "heals" better than it stretches so take that into consideration. And I had made up a felt wrapped tool, so maybe buy the right tools for the job is another lesson I learned, which I did order some tools for the next version, after removal, state inspection and applying the lighter tint.
Also I wrapped the little running side lights while they were in place, I found out later that these pop out quite easily so next time I will remove them and simply heat up the wrap and do it that way.

Lessons learned, and soon I will let you know how easily tint is removed from our lights, with a heat gun.
 

Latest posts

Members online

Forum statistics

Threads
36,259
Posts
218,004
Members
30,496
Latest member
washburn72
Top