Skunk in the garage...

Disclaimer: Links on this page pointing to Amazon, eBay and other sites may include affiliate code. If you click them and make a purchase, we may earn a small commission.

Delray

Well-Known Member
Joined
Nov 2, 2013
Posts
46
Reaction score
0
At least that is what my kids thought. It is actually the radiator fluid leaking, concentrating and burning in the engine bay.

I am not losing a lot of fluid. Long story short - I thought one of my belts or pulleys was going bad, it turned out to be radiator fluid dripping on the belts and the belts and pulley was consequently making noise.

After replacing both pulleys, belts, etc I realized it was the leak. I tightened the hoses, but there is still some fluid escaping. I will probably replace the upper radiator hoses as a precaution, but from these photos you can see where it is pooling - and also **** around a fitting on the thermostat assembly.

Questions:

1. How hard is the thermostat assembly to replace (I did all the belts and pulleys previously, so I am not afraid to get in there)

2. Does anyone have thoughts on location of leak? It appears to be the thermostat assembly or some other hose close by. It only seems to push out fluid when under stress or driving, so if I clean it up there is no dripping when engine is just running in the garage.

http://www.partsgeek.com/catalog/2005/land_rover/lr3/cooling_system/thermostat_assembly.html

Upper assembly here:
http://www.partsgeek.com/catalog/2005/land_rover/lr3/cooling_system/radiator_hose.html

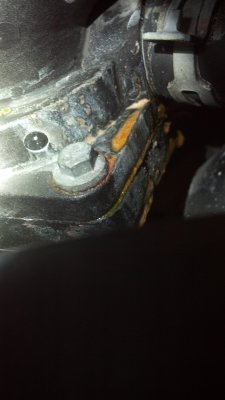
First photo shows coupling built into the thermostat. The only piece of the thermostat you can see in the new thermostat linked where there are two plates coupled together - the part photo shows holes for bolts but no actual bolts in the part photo.

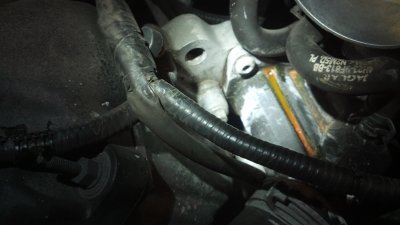
Second photo is just a recessed area on the thermostat where it is catching some fluid. I don't know if the fluid is getting pushed out of the thermostat itself, or just collecting there from a hose link in the area?
 

Attachments

  • IMG_20140608_123251_090.jpg
    IMG_20140608_123251_090.jpg
    1,002 KB · Views: 19
  • IMG_20140608_122929_186.jpg
    IMG_20140608_122929_186.jpg
    886.7 KB · Views: 21
Last edited:

CMGRover

Full Access Member
Joined
May 1, 2010
Posts
834
Reaction score
3
Thermostat is easy to replace, easier than any of the other stuff you've replaced lol.
 

thorgal

Full Access Member
Joined
Mar 25, 2009
Posts
496
Reaction score
1
Second photo shows fluid collecting on the lower part of the thermostat housing.This is where my leaking fluid was collecting as well, but in my case, after careful " look around " , I discovered a hairline crack in lower plastic thermostat housing itself, so I replaced a whole unit , that contains two parts and has thermostat already placed inside.the unit.
Look around carefully,especially on lower housing as it is attached to manifold and gets very hot over there, sadly many parts of cooling system is made out of plastic composite and cracked over thine as mine did around 106 000.in some cases a plastic bleeding valve cracks first, o top of the engine bay, but in your case it might jus be a lower or upper thermostat housing.
It is not to hard to replace at all, lower screws on the housing are hard to get to and you will definitely need a 12 inch extension on those torn screws , also air intake has to come off with a resonator along with a throttle body.
You can't just replace an upper part and leave the lower housing attached to manifold , as it is very temping , in case your upper part is leaking instead of lower, simply because a new assembly has been re designed slightly and old with new won't fit anymore.This is an easy part of the whole replacement as now will come a tedious coolant filing and bleeding all the air out of the system .I don't know how your approach will be , but I also replaced all the rubber hoses i the cooling system and basically had to drain all the coolant that was in the engine bay area, which contains a two gallons of mixture which is 50% of extended life LR coolant and 50% deskilled water.The whole system does not get drained as I p.e. have a rear AC therefore more coolant mixture remained in the rear hoses.
Bleeding process takes time and in my case took two evenings, but it is surely double.Good luck.
 
Last edited:

Delray

Well-Known Member
Joined
Nov 2, 2013
Posts
46
Reaction score
0
So are all the parts for the thermostat included in the linked part? Thanks
 

thorgal

Full Access Member
Joined
Mar 25, 2009
Posts
496
Reaction score
1
Yes ,new housing assembly contains thermostat inside..
 

Delray

Well-Known Member
Joined
Nov 2, 2013
Posts
46
Reaction score
0
Parts are ordered. This is the only process for flushing the antifreeze that I was able to come across. If there is an improved or preferred method, would love to hear it:

1 . Position the vehicle on a lift.
2 . Set the heater controls to maximum.
3 . Disconnect the battery ground cable.
Specifications
4 . Remove the engine cover.
5 . Remove the coolant expansion tank cap.
6 . Remove the front LH splash shield.
7 . Remove the radiator access panel.
8 . Position a container to collect the fluid.
9 . Release the clip and disconnect the radiator lower hose, allow the coolant to drain.
10 . Remove the container.
11 .Connect and secure the radiator lower hose.
12 . Connect the battery ground cable.
Specifications
13 . Connect exhaust extraction hoses to the tail pipes.
14 . Loosen the coolant expansion tank bleed screw.
15 . Fill the cooling system to the upper level mark of the expansion tank
16 . Tighten the bleed screw.
17 . Install the coolant expansion tank cap.
18 . Start and run the engine at idle until the normal operating temperature is reached.
19 . WARNING: Release the cooling system pressure by slowly turning the coolant expansion tank cap a quarter of a turn. Cover the expansion tank cap with a thick cloth to prevent the possibility of scalding. Failure to follow this instruction may result in personal injury.
NOTE : When the coolant bleed is complete and prior to installing the expansion tank cap, top-up the expansion tank to 30mm above the maximum level.
Switch the engine off.
a. Remove the coolant expansion cap, allow the level to settle and top-up so that the level is 30mm above the
upper level.
b. Allow the engine to cool.
20 . Install the engine cover.
21 . Clean any spilt coolant from the vehicle.
22 . Install the radiator access panel.
Tighten the 4 bolts to 10 Nm (7 lb.ft).
23 . Install the front LH splash shield.
 

Delray

Well-Known Member
Joined
Nov 2, 2013
Posts
46
Reaction score
0
So looking to replace the thermostat assembly I need to remove throttle body. I should have ordered gasket for throttle. Anyone salvage the old one? I would generally not do that, but need my vehicle monday

Thanks!
 
Last edited:

Delray

Well-Known Member
Joined
Nov 2, 2013
Posts
46
Reaction score
0
Okay, no replaceable gasket on the throttle body. That was a surprise.

Question on oil in the intake manifold. I can see down the throat of my LR3 with the throttle body removed. It looks like oil coating the inside and pooling in areas toward the back, maybe 1/8 of an inch. Is this normal/healthy?

Thanks
 

jbrincks

Full Access Member
Joined
Nov 11, 2011
Posts
58
Reaction score
1
Okay, no replaceable gasket on the throttle body. That was a surprise.

Question on oil in the intake manifold. I can see down the throat of my LR3 with the throttle body removed. It looks like oil coating the inside and pooling in areas toward the back, maybe 1/8 of an inch. Is this normal/healthy?

Thanks

Yes the oil buildup is normal. I did the same repair earlier this year. I removed the throttle body and cleaned while everything else was off. Before doing this the LR3 would idle rough...this completely fixed it.

I would suggest cleaning while everything is apart.
 

Delray

Well-Known Member
Joined
Nov 2, 2013
Posts
46
Reaction score
0
Thanks jbrincks, it turns out not as much oil was in there as I thought. More of an oil coating than anything else. I cleaned it out and got everything back together.

Does anyone know why you need to remove the radiator access panel on the bottom/front of the vehicle? The drawing here shows the only hose you detach is the one behind the LH access panel?


http://workshop-manuals.com/landrov...stem_draining_filling_and_bleeding/page_1265/


It was a lot more work than I anticipated. Those bolts under and around the manifold and throttle were a pain. They required extensions (as noted) and finesse to keep bolts from falling into the nether regions. I recovered a bolt, but lost a 1/4" to hex adapter. There are a ridiculous amount of hoses to unclamp and move around. When putting things back together I would put some sticky material in the bits and bolts to make sure I did not lose anything on their long trips back to hiding places.

Recharging and bleeding the coolant lines went well. I don't have the rear heating on the vehicle.

The manifold did not have any cracks I could see but was leaking from the rear of the coupled/bolted area. I probably could have put a seal on that and kept going, but by the time everything is apart - better to replace since these seem to go bad/crack at around 100K anyway.

I guess I'm good for another 100K :) I have never replaced the compressor, so that will probably be the next big thing.
 
Last edited:

Staff online

  • joey
    Custom Rover Accessories

Members online

Forum statistics

Threads
36,267
Posts
218,057
Members
30,497
Latest member
TeriM
Top