Throwing code P0807 - Clutch position sensor - circuit low

Disclaimer: Links on this page pointing to Amazon, eBay and other sites may include affiliate code. If you click them and make a purchase, we may earn a small commission.

allegro

Well-Known Member
Joined
Apr 10, 2018
Posts
63
Reaction score
21
Location
Northern California
I started up my 2012 LR4 w/rear diff this morning and noticed a "service required" message flash on the display for a few seconds - I think I just forgot to reset the service reminder in my last oil changes, but the message prompted me to plug in the GAP IIDTool and look for faults. Unfortunately, I'm seeing this one:

P0807-00 (7F) Clutch position sensor - circuit low
(RDCM-Rear Differential module)

I cleared faults and this triggered again right away. Any ideas about diagnosis from here? Searches don't reveal much of anything LR4-specific about this code; I do see LR3 threads though with similar rear diff codes discussing issues ranging from control module to rear diff replacement.

No check engine light or performance issues of any kind on my end, newish battery, 117K miles, no other clues. FWIW there was one other electrical fault on the IIDTool, B1163-15 (2E) for left mirror heater output "general electrical failure - circuit short to battery or open", triggered a few days ago.

Thanks for any ideas!
 

Stuart Barnes

Full Access Member
Joined
Oct 27, 2019
Posts
443
Reaction score
237
Location
Los Angeles
I had the same thing. Check the connection to the diff motor under the car. In my case I test cycled it a couple of times on the iid tool and it got stuck somewhere partially engaged. This dropped the car to its bump stops and lit up the dash like Christmas.

I ended up changing the motor and all has been good since.
 

allegro

Well-Known Member
Joined
Apr 10, 2018
Posts
63
Reaction score
21
Location
Northern California
Thanks Stuart!

I'm going to start with a little multimeter testing to make sure mice aren't to blame... and meanwhile I think it won't hurt to get the part on hand and swap it in as preventive maintenance.

I ended up changing the motor and all has been good since.

You dropped in part LR032711, correct? I see that this part has been in use across several LR models and generations and there are several aftermarket options. Did you go OEM or find a reputable aftermarket supplier?
 

Stuart Barnes

Full Access Member
Joined
Oct 27, 2019
Posts
443
Reaction score
237
Location
Los Angeles
I put in a complete motor and gear assembly. It’s only 4 bolts. But if you go that route make sure you clean the sealing face on the diff thoroughly. Also I used the loctite sealant that Land Rover recommend for the joint. After installing and testing I changed the oil.

If you go down the route of just the motor then this is sealed with an o-ring which should be with the new part.

I’ll double check the part number.
But yes I believe that this is used across the product line.

After the install I used the iid tool to function test the new motor. This apparently lets the system know the limits of open/closed on the clutch packs. In the Land Rover literature I think it mentions to calibrate the motor operation. This does the same thing.

On a side note my motor had seized. Due to lack of use probably. I took the old one apart once I had removed the assembly and it’s now ready to go as a working spare.
 

allegro

Well-Known Member
Joined
Apr 10, 2018
Posts
63
Reaction score
21
Location
Northern California
Right on - I’d go for the whole assembly as well.

What’s the preferred access for getting those 4 bolts off? Does dropping the spare get you there, or do you need to lower the diff a bit to get clearance for a wrench?

Really appreciate your help. Our truck is a daily driver so I’ll need to have ducks in a row before diving in.
 

Stuart Barnes

Full Access Member
Joined
Oct 27, 2019
Posts
443
Reaction score
237
Location
Los Angeles
no need to lower the spare or lower diff.

I put it into off road mode then raised another couple of inches with the jack stands to give me more clearance.

you will need (to completely replace the entire assembly)

LR 032711

loctite 5900
scraper (small 6")
pry bar (small 6")
shallow and deep sockets 8mm
extension bar
universal joint
ratchet
shop towels
contact cleaner
inspection mirror / phone camera

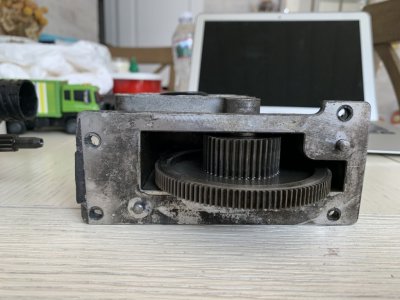
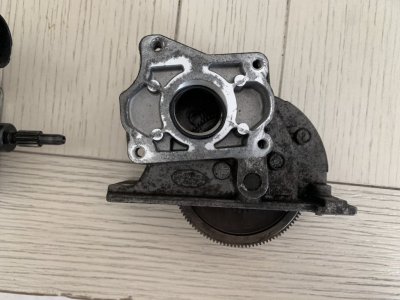
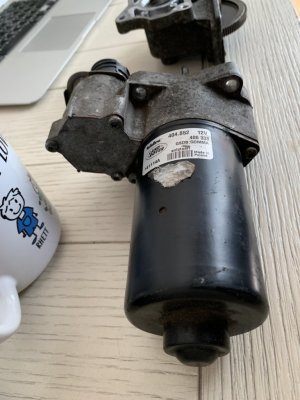
IMG_4894.JPG IMG_4895.JPG IMG_4893.JPG


in the photos you can see the locating dowels these are the hardest to line up, so take your time.
make sure that you thoroughly clean the surfaces of the diff and the new part. After scraping I use alcohol on a shop towel. You ned to have them spotless for the loctite to really do its job as its the only thing keeping the elements out of the differential.

before you start this make sure you really inspect the new part for any damage etc and make sure you have all the tools on hand. Remember the loctite has a shelf life and this will be printed on the tube you don't need much 75ml is plenty enough, although I bought a 19 buck tube off amazon, so not the smallest. when you use this for the sealing faces squirt some onto a piece of cardboard etc so you can gauge the curing time for your circumstances.

1. jack and support car sufficiently.
2. disconnect battery.
3. remove the electrical plug to motor.
4. clean area around motor removing big lumps of dirt and dust etc.
5. remove the 8mm bolts securing the motor gear to the differential.
6. using the pry bar lever under the motor against the differential to get the loctite seal to break and the motor and gear housing free of the differential.
7. jiggle, curse, shout, make a cup of tea and then finally remove the motor and gear assembly, cover open differential housing with a lint free cloth.
8. inspect the differential and clean off all the residue from the loctite. (inspection mirror/phone camera)
9. clean the plug on the differential with some contact cleaner and a shop towel, keep going until it runs clear when you spray into the pins of the plug.
10. thoroughly clean the differential sealing surface and new gear housing sealing face with contact cleaner.
11. apply an even thin coat of the loctite to the gear housing.
12. jiggle, curse, shout, make a cup of tea and then finally replace the motor and gear assembly, it should be snug and flush with the diff casing and be located on the dowel pins.
13. tighten down the 8mm hex head bolts for the gear housing being careful to ensure that it tightens evenly, you will get some of the loctite squishing out of the sides, this is normal, you shouldn't have any real resistance on the bolts until the last couple of clicks on the ratchet to 10Nm
14. reinstall the electrical plug to the diff motor.
15. clean up any loctite that squished out.
16. lower car off jack stands.
17. connect battery.
18. start.
19. witness some error codes.
20. reset any codes. test operation of the rear differential with your gap iid tool. this is in the differential module menu, if I remember correctly.
21. let loctite cure / go off fully before driving.
22. replace differential oil sooner rather than later.
23. drive and be happy

24. wish that I had uploaded this tutorial to my new YouTube channel "wrenching n roverin" a month ago.

if you need anything more let me know and I'll happy get on zoom for you :)

Stu.
 

Stuart Barnes

Full Access Member
Joined
Oct 27, 2019
Posts
443
Reaction score
237
Location
Los Angeles
In my case as soon as I took the old motor and gear assembly apart I realized that the motor was stuck.
The gear assembly was fine.
The motor has a braking mechanism to hold it in place at the required locking / slip level for the differential and this brake was giving me the error codes as the car was saying give me a fully open diff and the motor was stuck a couple of degrees closed.
I freed this and cleaned everything up, now I have a spare sitting on the shelf. :) so have a look at yours before you send it to the big parts bin in the sky.

Also to note, and I've raised this on another thread as well, if this motor gives up the ghost partially locking the diff the car drops down to the bump stops and nothing I could do would get it to raise again.

Although I didn't try and interfere with it electrically I must add.

Stu.
 

allegro

Well-Known Member
Joined
Apr 10, 2018
Posts
63
Reaction score
21
Location
Northern California
Huge thanks @Stuart Barnes for your detailed write-up - truly makes such a huge difference for someone like me who is happy wrenching on my vehicles but has a lot to learn.

I’ll update here once I have parts on hand and get into the project. If I could get you a 6-pack via zoom, I would!
 

Stuart Barnes

Full Access Member
Joined
Oct 27, 2019
Posts
443
Reaction score
237
Location
Los Angeles
no sweat @allegro if I could drink a zoom 6 pack I would, I'm sure I'll see you out on the trail one of these days, if not then pay the favor forward in your own way.

Stu.
 

Latest posts

Members online

Forum statistics

Threads
36,272
Posts
218,137
Members
30,499
Latest member
Vintage99
Top