Fix LR3 stuck tailgate instructions
I also managed to fix it and will do a bit of a write-up to help you guys. A bit tricky but definitely possible to do yourself (and not spend $500-$1000).
First, get hold of the technical bulletin "LTB00191", I found one at
http://www.disco3.co.uk/gallery/albums/userpics/13978/Liftgate Latch Diagnostics.pdf. This has photos of what you should be doing. I found that even with this, it was still tricky.
Step 1: Get yourself a flat putty knife (2" wide), a knife or a flat screwdriver - I used the putty knife. Get into the back of your LR3 and look at the back. You'll see the S shaped plastic trim around the carpet on the lower gate. Just to the left of the middle S, prise the lower liftgate carpet from under the top trim of the liftgate. Be careful not to damage the trim, but you should be able to fairly easily lift the top trim over the hard carpet piece. The carpet is glued to a piece of hard plastic and you need to get this plastic out from under the top trim. Should take about 5 minutes to do this. Work your way from the middle to both sides and position the carpet trim away from the liftgate. This will open a 2-3" gap for you where you should see the inside.
Step 2: Once you have loosed the carpet trim, push your hand into the gap and start removing the water shedder on the inside. This is that piece of thin foam that is glued over the holes in the liftgate. You need to remove this to get access to the latch. I used my hands to poke holes into the water shedder and then rip it out piece by piece. You really have no choice here and must remove the water shedder. To give me more space to work with, I inserted two tennis balls on the left and right hand side of the carpet trip inside the gap.
Now it becomes tricky and this is where the technical service bulletin lost me a bit. The photos they have in the bulletin, shows all the pieces as if the liftgate is already open and you have easy access to everything - in real life, you only have 2" inches to work with, can't see much and it's a lot trickier. Once you have removed the water shedder, you will see the actuator and the cable going to the latch - just to the left of the middle of the liftgate. Don't bother with the actuator, but follow the cable to the latch. You won't see the latch, but should be able to feel it, it's hidden behind parts of the liftgate body, just to the left of the middle at the top of the liftgate. I used a flashlight and a small mirror and squeezed this into the gap to take a look at the bottom side of the latch.
Step 3: Drink a glass of water\whisky\beer, because you will now need all the patience in the world. On the bottom side of the latch is a small hole - you can see this if you used a small mirror like I did (or the photos in the bulletin), but you can also feel it with your fingers. Keep in mind that you can't see the latch and have to work a bit blind here. Use a small screwdriver and try to get it into that small hole. I used a flat screwdriver that was about 4" long. This may take a few tries, but once you have the screwdriver into the hole, move it back and forth. This requires you to stick your hand through that 2" gap, point the screwdriver up at the latch and feeling a bit with your fingers for that hole. If you are really lucky you will hear a pop and the top liftgate wlll open! Finish the rest of the water\whiskey\beer!
Step 4: The rest is much easier. With the liftgates open, you will have to remove the carpet trim piece to get access to the actuator. This is done by removing the two side screws that holds the two liftgate cables in place on the bottom liftgate. Put the carpet trim to the side and you will now also see the screws that holds the actuator in place. Unplug the electric cable that goes to the actuator (you can get access to this through the hole where you remove the water shedder by the actuator). Take out the actuator and open the plastic covering.
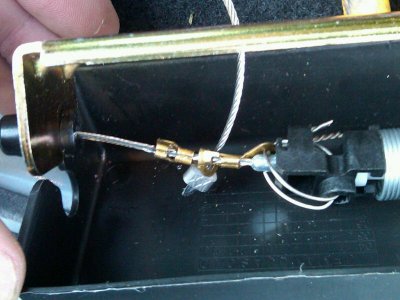
Chances are very good that you will now also see the problem as to why the liftgate didn't open in the first place. There is a small (very small) L piece of metal at the end of the cable that connects to the actuator. Mine broke right at the elbow of the L. The engineer that designed that should be fired! No wonder everybody is having problems with this.
Anyway, I used some metal wire and connected the cable very thoroughly to the actuator end-piece again. I'll lave it up to you as to how you want to repair that piece. I heard some people used a cable tie. Mine will definitely not come loose again, but just to play it save, I also added a second flexible cable to the actuator end-piece and run that into the back of the LR3 with a pull ring to manually open it if that actuator cable breaks again.
Happy driving!


