Rear Heater Manifold Pipe Replacement Without removing Supercharger - The Beginning

Disclaimer: Links on this page pointing to Amazon, eBay and other sites may include affiliate code. If you click them and make a purchase, we may earn a small commission.

richord

Well-Known Member
Joined
Jul 21, 2025
Posts
73
Reaction score
41
Location
NJ
My front coolant pipes and water pump were replaced by the previous owner 3 years and 30,000 miles ago. There are no leaks. I recently replaced the main radiator, which had a small leak and replaced all the coolant hoses, thermostat as well as both belts and tensioners and the fan.

What I discovered from this adventure is it's better to use OEM parts. I bought a few aftermarket hoses, but some didn't quite fit properly. The fan is after market and it's fine.

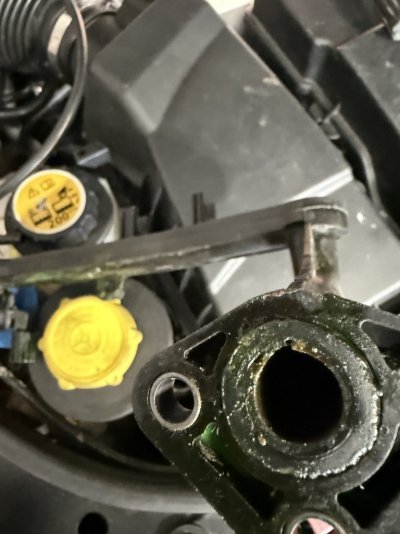
After doing this work, I discovered, using an endoscope camera, that the rear Heat Manifold (rear crossover) pipe was leaking. I looked at numerous videos and online forums showing how others removed the supercharger but, in these instances, they were replacing the front cross over pipes as well.

I didn't need to change those pipes or the water pump, so I decided to attempt changing the rear pipe without removing the supercharger. Something that is ill advised.

My first concern was there enough room to get my hands back there and would the wrenches etc. fit. My next concern was were the torx screws holding the pipe seized. Using the camera pictures, I was able to see the torx screws that hold the pipe. I was able to get a torx bit and ratchet on two screws to see if I could loosen them. This worked!

I've begun removing the backets holding the engine cover and the bracket that holds the wire loom channel at the back of the engine and freeing up the wire loom by removing the plastic cover and clipping some tie wraps.

I setup my iPhone to record my work to help me when I reassemble everything but also if this works, to post my adventure.

I found a document that describes this procedure for a V8, naturally aspirated and supercharged.


Any suggestions are welcome. I will post my progress, or failure.
 

Attachments

  • Rear Coolant Crossover Pipe 2011_X351_supercharged_rear_coolant_cross_over.pdf
    1.4 MB · Views: 93

Donnair

New Member
Joined
Oct 20, 2021
Posts
2
Reaction score
0
Location
Texas
I have a similar situation with my 2016 LR4. Rear pipe is not leaking YET. I will be interested in your process on this project. Please continue to post.
 

richord

Well-Known Member
Joined
Jul 21, 2025
Posts
73
Reaction score
41
Location
NJ
I removed the old pipe, without breaking anything! The only "damage" was to my arms which got scraped up reaching into the rear.

It took about 8 hours to remove the pipe. Some of that time was spent configuring my various ratchets and extensions to get to the torx screws. And trying different ways to prevent dropping tools into the pit behind the engine. I've attached a series of pictures showing the various ratchet configurations I used for each screw. In spite of trying not to drop tools, I did. Have a telescopic magnet on hand!

It takes patience to remove the screws. There is very little space to turn the ratchet and a lot of turns on each screw. This takes a lot of time. When you get near the end you have to be very careful not to drop the screw. You also are working "blind". I have some mechanic's mirrors but found them somewhat disorienting. Left is right and right is left!

I spent some time working out what to do next and trying different ways to access the wire loom box and all its associated clips. That took up some of the time.

Lighting is critical. I have an led work light that fit into the space, as well as a light illuminating the back of the supercharger.

I also made sure I had a variety of torx bits. I did not use the type that states they remove "security" torx. They had a hole in the center.

The wire loom that goes through a plastic "box" or more appropriately, a "maze", and associated bracket is a work of sheer insanity There are tie wraps and Christmas tree clips that have to be cut or extracted. I'm considering if I will put it back. I may use heated resistant covering instead to make it easier to work back there in the future.

Note the advanced painters tape used to prevent the tools from falling in the pit!

I ordered an aluminum replacement pipe. It's supposed to arrive today. I will look at it to ensure the mounting holes and O-ring seal are identical to the old one. I will also examine the casting to see if there are defects in it. If it looks ok, I will install it. My theory is that although this pipe may leak, it's less likely to disintegrate like the plastic so a catastrophic failure is less likely. If it doesn't look well-made, I will order the original part which continues to be a poor design.

I will post further and then put together a "show" with some videos I've taken.
 

Attachments

  • Tool Configurations for pipe screws.pdf
    1.1 MB · Views: 80

Ryan00TJ

Well-Known Member
Joined
Apr 8, 2016
Posts
68
Reaction score
21
I replaced my front crossover pipes, water pump etc. 16' with 72k. Instead of pulling the SC, I removed the SC snout. Upgraded to a solid Eaton coupler and changed SC oil. Rear pipe was not leaking. I plan on monitoring it. I feel your pain trying to do it with SC installed. Very little room to work. Good luck! Which brand aluminum crossover?
 

richord

Well-Known Member
Joined
Jul 21, 2025
Posts
73
Reaction score
41
Location
NJ
I got the WMPHE on Amazon. I looked at the seam, and it didn't appear to be uniformly sealed. I tried the screws that hold the two castings together and they were not torqued the same. Also, the hose connections are polished, and I'm concerned they may not seal as well as the plastic pipe, particularly the hose that clips on. I think I may use the OEM pipe in spite of its poor design.
 

richord

Well-Known Member
Joined
Jul 21, 2025
Posts
73
Reaction score
41
Location
NJ
Land Rover now make an alu rear heater manifold for the V6, you might look into that.
I've looked but have never found a genuine OEM rear pipe. Some vendors state, "genuine OEM part numbers".
 

ftillier

Supporting Member
Supporting Member
Joined
Jul 27, 2021
Posts
923
Reaction score
507
Location
Portland, OR, USA
I saw recently someone post a picture, with jlr label, of an aluminum one. I cannot for the life of me find it again though.
 

richord

Well-Known Member
Joined
Jul 21, 2025
Posts
73
Reaction score
41
Location
NJ
I saw recently someone post a picture, with jlr label, of an aluminum one. I cannot for the life of me find it again though.
I looked on ebay and saw some that had labels that replicated the Land Rover color and layout, but you couldn't read the text. Example below.

I sent an email to one seller asking if they were genuine and received a response that these were "better" than OEM.


I've decided to install the aftermarket aluminum pipe. I will not install the plastic box around the wire loom or the bracket, so I can remove it easier if I have any problems. I am adding some additional protection that resists heat and liquids on the wire loom. It would take about 2 hours to replace it now that I know how to do it and have the configurations for the ratchet sets for each screw.

Attached is a picture of the pipe I removed.

I'm also replacing another pipe. It was difficult to remove and one end is a slip-on latching connector which in most cases are "one time use". In my experience they tend to leak when reused.

LR031393​


Attachments

  • IMG_8490.jpeg
    IMG_8490.jpeg
    106.7 KB · Views: 85
Last edited:
As an eBay Associate we earn from qualifying purchases.

richord

Well-Known Member
Joined
Jul 21, 2025
Posts
73
Reaction score
41
Location
NJ
I completed the replacement of the rear heater manifold pipe (rear cross over) with an aluminum aftermarket pipe.

I did not remove the supercharger or the top of the supercharger. This was working blind most to the time because I couldn't see the screws holding the pipe.

What I did have was the video from user: txfromwi. I watched some of the clips in this video 10 or more times. I planned my work using his experiences.

Disassembly was challenging but assembly was the hardest part. In fact, it was only one screw holding the pipe that was the biggest challenge since I could not get my hands or fingers in a position to put the screw in place. I finally figured out I could use a zip tie to position the screw in place and then use a Rube Goldberg configuration of my rackets, extensions and torx bits. This one screw consumed about 4 hours!

I just finished putting everything together and started it up. It works with no leaks.

For those who've wondered; "can you replace the rear pipe without removing the supercharger", the answer is YES! Is it easy? No but with patience and the right tools and being able to lie on top of the engine, working blind, it's possible.
 

Latest posts

Members online

Forum statistics

Threads
37,146
Posts
226,329
Members
31,263
Latest member
KyleK951
Top