
CaptainSpalding
Explorer
- Joined
- Oct 13, 2010
- Posts
- 225
- Reaction score
- 7
Hello all,
Recently I bought a hitch mount bike rack for my LR4. I looked at lots of different configurations and models. My criteria: 1. I didn't want to put bikes up on the roof. That is a recipe for scratched paint or broken glass. I'm too short and the LR4 is too tall, even at access height, to make that a good idea, at least for me. 2. I wanted a platform-style rack, which means the bike sits on its wheels rather than hangs from its frame. Frames come in many more different shapes than they used to, and a platform hitch keeps things simple. 3. I wanted the rack to fold out of the way when not in use. And, finally, it must to hold 4 bikes in a way that jeopardizes neither the bikes nor the LR4. Ultimately I settled on the Swagman XTC4 hitch mounted platform rack.
Job one was to get the factory hitch receiver for my LR4. Long story short, I shopped on the internet before going to my local LR parts counter, and talked them down to the internet price (saving $125 in the process.) The part no. is LR019990, and that's the receiver only with no trailer wiring. For those unfamiliar with it, I'll say a few words about the hitch, which came in a cardboard box with two keys and no instructions at all. To install it is very simple. Under the bumper a red cover plugs the recess that the hitch receiver installs into. The cover is no doubt there to keep mud and other debris out of the recess. I could see that any debris in there would make it difficult or impossible to install the hitch.

Top left: The factory Land Rover hitch receiver. Top center: The red hitch receiver recess cover. Top right: Once the plug is out it's easy to see how it all works.
Bottom left: the bolt extended (circled in yellow) Bottom left inset: the silver pin. Bottom right: the receiver in place and ready to go.
To install the hitch receiver, first remove the red cover. It's easy to see how the receiver mounts to the truck once the plug is out. A silver pin protrudes from the top of the receiver. When the receiver is pushed up into the recess, the pin is depressed, and a bolt slides out (circled in yellow above) to lock the receiver into place. Don't have your hand on the green knob as you push the receiver into position. The knob spins briskly when the bolt is extended under spring pressure. Once the hitch is secured in place, the key may be turned counterclockwise and removed.
To remove the hitch receiver, insert the key into the keyhole in the green knob and turn it clockwise. Now pull the knob outboard and rotate it counter clockwise. As the knob is turned, the bolt is withdrawn, and the receiver will drop into your waiting hand. I have to say that I was impressed. It's pretty amazing that a Class III hitch can be installed or uninstalled without tools in under 5 seconds.
Now on to the main attraction. The Swagman XTC4 rack.
I bought it online from Amazon for $278 plus shipping. It's heavy. The shipping weight was 64 lbs. (I got free shipping by upgrading to Amazon prime.) The instructions don't offer a lot of detail, so save the box. You'll need the picture.

Top left: the box. Top right: Yes, it's heavy.
Bottom left: what the parts look like after de-boxing and de-bubble wrapping. Bottom right: All assembled.
Assembly took about a half hour (including taking these photos), requiring only a ½" socket and driver and a Phillips screwdriver. All the components are powder coated. The hardware is of decent quality, and the whole thing is held together with nylock nuts, so the rack won't rattle apart. The hoops that hold the bicycle wheels slide back and forth on rails to accommodate bikes with varying wheelbases. They are secured via knobs which provide adequate tension to keep the hoops from slipping out of position. Perforated rubber straps secure onto pegs on the hoops, and lock the wheels into the hoops. The hoops are prevented from sliding off the arms by a Phillips screw underneath.
There are two vertical masts, each of which supports two bikes by way of padded hooks which grab the frame from the top. The masts have a serration on the corner, and pawls in the mechanisms of the padded hooks grab the serrations. The rack came with a locking anti-rattle hitch pin. The hitch is threaded on the inside, and the pin is threaded too. You'll have to add a ⅞" wrench to your kit to tighten the pin. You could of course substitute any standard ⅝" hitch pin and not need the wrench, but the anti-rattle feature is nice. The lock comes with two cylindrical keys and an added bonus: a cable which attaches to the hitch pin and then may be used to lock the bikes while on the rack. There was no mention of the locking hitch pin or the cable lock in the documentation at all. After I assembled the rack I tried all the pins in their proper holes. The rack can pivot on the hitch in order to be folded up. A pin which secures the rack in the up or down position was a little tight in the hole, so I opened up the hole with an 11/32" drill bit. Another feature is that pins can be pulled to allow the masts to be folded down for tailgate access.

Top left: A Phillips screw prevents the hoops from sliding off. Top center: the locking anti-rattle hitch pin with cable. Top right: Testing the fit of the Land Rover hitch receiver.
Bottom left: The wheel hoops, with rubber straps and adjustment knobs. Bottom right: the serrated mast and the padded hook ratchet mechanism.
Bikes should be loaded on the rack starting with the space closest to the car and then progressively outward, with the heaviest bike first in order to minimize leverage. To load a bike, first adjust the width between the hoops to approximate the wheelbase of the bike. Set the bike onto the hoops and fine tune the hoop spacing. Make adjustments with one hand while you keep the bike stable with the other. Pull the rubber straps through the spokes and secure the wheels to the hoops. Next, slide one of the hooks down the mast. It will ratchet down onto the top tube of the bike, and you're done. The hoops hold the weight of the bike. The rubber straps keep the bike from rolling or bouncing out of the hoops. The padded hook on the mast keeps the bike upright and away from the adjacent mast and other bikes. It also is a backup to keep the wheels in the hoops should one of the rubber straps fail. Avoid the temptation to press the hooks so firmly down on the bike that the tires are compressed. Just lower the hook until it touches the frame and the bike will be securely held in place. If the bicycle's tubing is thin, too much pressure could dent the frame. This isn't in the instructions. Ask me how I know. Unloading the bike is simply a matter of loosening the rubber straps and raising the hook off the frame. Once a spot on the rack has been set up for a particular bike, subsequent loading and unloading of that bike in the same spot takes only seconds.
With no bikes on the rack, the masts can be folded down and secured, and the rack folded up and pinned into the folded position. I was pleased to find that there was plenty of clearance, both between the LR4 and the folded rack, and also between the LR4 and a loaded bike. I really like how the bikes are protected from beating one another up in transit on this rack. Also, with no bikes on the rack and the masts folded down, tailgate access was easy.

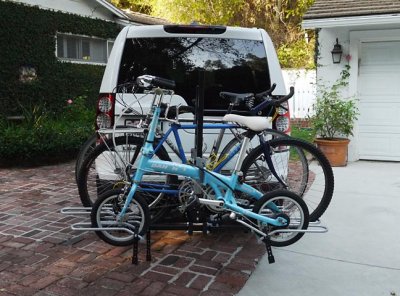
Top left: bikes loaded on the rack. Top center: Plenty of space between the bike and the truck. Top right: plenty of space between the folded rack and the truck.
Bottom left: The padded hooks holding the bike frames. Bottom center: the cable on the hitch pin. Bring your own padlock. Bottom right: Tailgate access is easy with the masts folded down.
This weekend I took a road trip with the family. The trip was 2+ hours each way, mostly freeway driving, with several rough spots because of construction. I checked the rack at every stop, and the bikes were held perfectly secure. I was also pleasantly surprised by the following. I have a steep driveway, and I was concerned that the truck wouldn't make it past the bottom of the driveway with the rack attached without scraping or damage. I tried it, and found that it clears by a fraction of an inch. With off-road height selected, it clears with room to spare.
I would consider this a medium duty rack. If you intend to load a rack up with four heavy downhill bikes and crawl up a trail or traverse 20 miles of washboard in search of that perfect singletrack, this rack might not hold up to the beating. There are better built and more expensive racks that will do the job. But for bringing bikes along for the whole family on vacation, this is a great rack.
Recently I bought a hitch mount bike rack for my LR4. I looked at lots of different configurations and models. My criteria: 1. I didn't want to put bikes up on the roof. That is a recipe for scratched paint or broken glass. I'm too short and the LR4 is too tall, even at access height, to make that a good idea, at least for me. 2. I wanted a platform-style rack, which means the bike sits on its wheels rather than hangs from its frame. Frames come in many more different shapes than they used to, and a platform hitch keeps things simple. 3. I wanted the rack to fold out of the way when not in use. And, finally, it must to hold 4 bikes in a way that jeopardizes neither the bikes nor the LR4. Ultimately I settled on the Swagman XTC4 hitch mounted platform rack.
Job one was to get the factory hitch receiver for my LR4. Long story short, I shopped on the internet before going to my local LR parts counter, and talked them down to the internet price (saving $125 in the process.) The part no. is LR019990, and that's the receiver only with no trailer wiring. For those unfamiliar with it, I'll say a few words about the hitch, which came in a cardboard box with two keys and no instructions at all. To install it is very simple. Under the bumper a red cover plugs the recess that the hitch receiver installs into. The cover is no doubt there to keep mud and other debris out of the recess. I could see that any debris in there would make it difficult or impossible to install the hitch.
Top left: The factory Land Rover hitch receiver. Top center: The red hitch receiver recess cover. Top right: Once the plug is out it's easy to see how it all works.
Bottom left: the bolt extended (circled in yellow) Bottom left inset: the silver pin. Bottom right: the receiver in place and ready to go.
To install the hitch receiver, first remove the red cover. It's easy to see how the receiver mounts to the truck once the plug is out. A silver pin protrudes from the top of the receiver. When the receiver is pushed up into the recess, the pin is depressed, and a bolt slides out (circled in yellow above) to lock the receiver into place. Don't have your hand on the green knob as you push the receiver into position. The knob spins briskly when the bolt is extended under spring pressure. Once the hitch is secured in place, the key may be turned counterclockwise and removed.
To remove the hitch receiver, insert the key into the keyhole in the green knob and turn it clockwise. Now pull the knob outboard and rotate it counter clockwise. As the knob is turned, the bolt is withdrawn, and the receiver will drop into your waiting hand. I have to say that I was impressed. It's pretty amazing that a Class III hitch can be installed or uninstalled without tools in under 5 seconds.
Now on to the main attraction. The Swagman XTC4 rack.
I bought it online from Amazon for $278 plus shipping. It's heavy. The shipping weight was 64 lbs. (I got free shipping by upgrading to Amazon prime.) The instructions don't offer a lot of detail, so save the box. You'll need the picture.
Top left: the box. Top right: Yes, it's heavy.
Bottom left: what the parts look like after de-boxing and de-bubble wrapping. Bottom right: All assembled.
Assembly took about a half hour (including taking these photos), requiring only a ½" socket and driver and a Phillips screwdriver. All the components are powder coated. The hardware is of decent quality, and the whole thing is held together with nylock nuts, so the rack won't rattle apart. The hoops that hold the bicycle wheels slide back and forth on rails to accommodate bikes with varying wheelbases. They are secured via knobs which provide adequate tension to keep the hoops from slipping out of position. Perforated rubber straps secure onto pegs on the hoops, and lock the wheels into the hoops. The hoops are prevented from sliding off the arms by a Phillips screw underneath.
There are two vertical masts, each of which supports two bikes by way of padded hooks which grab the frame from the top. The masts have a serration on the corner, and pawls in the mechanisms of the padded hooks grab the serrations. The rack came with a locking anti-rattle hitch pin. The hitch is threaded on the inside, and the pin is threaded too. You'll have to add a ⅞" wrench to your kit to tighten the pin. You could of course substitute any standard ⅝" hitch pin and not need the wrench, but the anti-rattle feature is nice. The lock comes with two cylindrical keys and an added bonus: a cable which attaches to the hitch pin and then may be used to lock the bikes while on the rack. There was no mention of the locking hitch pin or the cable lock in the documentation at all. After I assembled the rack I tried all the pins in their proper holes. The rack can pivot on the hitch in order to be folded up. A pin which secures the rack in the up or down position was a little tight in the hole, so I opened up the hole with an 11/32" drill bit. Another feature is that pins can be pulled to allow the masts to be folded down for tailgate access.
Top left: A Phillips screw prevents the hoops from sliding off. Top center: the locking anti-rattle hitch pin with cable. Top right: Testing the fit of the Land Rover hitch receiver.
Bottom left: The wheel hoops, with rubber straps and adjustment knobs. Bottom right: the serrated mast and the padded hook ratchet mechanism.
Bikes should be loaded on the rack starting with the space closest to the car and then progressively outward, with the heaviest bike first in order to minimize leverage. To load a bike, first adjust the width between the hoops to approximate the wheelbase of the bike. Set the bike onto the hoops and fine tune the hoop spacing. Make adjustments with one hand while you keep the bike stable with the other. Pull the rubber straps through the spokes and secure the wheels to the hoops. Next, slide one of the hooks down the mast. It will ratchet down onto the top tube of the bike, and you're done. The hoops hold the weight of the bike. The rubber straps keep the bike from rolling or bouncing out of the hoops. The padded hook on the mast keeps the bike upright and away from the adjacent mast and other bikes. It also is a backup to keep the wheels in the hoops should one of the rubber straps fail. Avoid the temptation to press the hooks so firmly down on the bike that the tires are compressed. Just lower the hook until it touches the frame and the bike will be securely held in place. If the bicycle's tubing is thin, too much pressure could dent the frame. This isn't in the instructions. Ask me how I know. Unloading the bike is simply a matter of loosening the rubber straps and raising the hook off the frame. Once a spot on the rack has been set up for a particular bike, subsequent loading and unloading of that bike in the same spot takes only seconds.
With no bikes on the rack, the masts can be folded down and secured, and the rack folded up and pinned into the folded position. I was pleased to find that there was plenty of clearance, both between the LR4 and the folded rack, and also between the LR4 and a loaded bike. I really like how the bikes are protected from beating one another up in transit on this rack. Also, with no bikes on the rack and the masts folded down, tailgate access was easy.
Top left: bikes loaded on the rack. Top center: Plenty of space between the bike and the truck. Top right: plenty of space between the folded rack and the truck.
Bottom left: The padded hooks holding the bike frames. Bottom center: the cable on the hitch pin. Bring your own padlock. Bottom right: Tailgate access is easy with the masts folded down.
This weekend I took a road trip with the family. The trip was 2+ hours each way, mostly freeway driving, with several rough spots because of construction. I checked the rack at every stop, and the bikes were held perfectly secure. I was also pleasantly surprised by the following. I have a steep driveway, and I was concerned that the truck wouldn't make it past the bottom of the driveway with the rack attached without scraping or damage. I tried it, and found that it clears by a fraction of an inch. With off-road height selected, it clears with room to spare.
I would consider this a medium duty rack. If you intend to load a rack up with four heavy downhill bikes and crawl up a trail or traverse 20 miles of washboard in search of that perfect singletrack, this rack might not hold up to the beating. There are better built and more expensive racks that will do the job. But for bringing bikes along for the whole family on vacation, this is a great rack.