
scapistron
Full Access Member
This is going to be a long one, strap in.
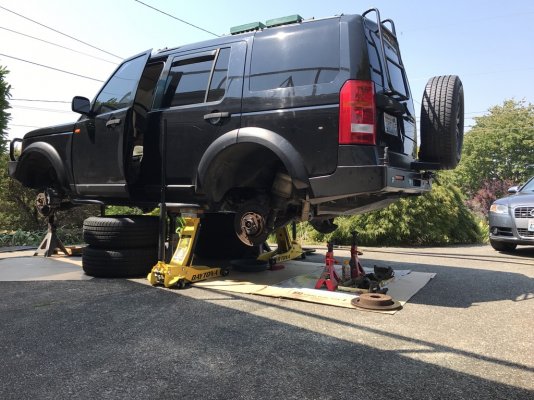
I ordered the Long Range America tank for my LR4 back in mid-January, delivery didn't happen until mid-June because of current events. It sat in my basement for a couple of months while I tended to other things, but I finally got around to installing it this weekend in anticipation of a long road trip west in a few weeks.
Installation wasn't easy nor exceptionally difficult. It took me about 10 hours overall over the span of three days and only two trips out to the store for additional parts. The quality of the tank seems really good; the rest of the kit seems like it was cobbled together in someone's garage. I'd have preferred to have paid a bit more and had AN fittings or o-ring face seal. NPT is just a bit of a pain in this sort of application where the clocking of the fitting is important. I didn't have any real trouble, but I could easily see someone else struggle with an elbow pointed in the wrong direction. Some of the hardware should probably be swapped out for flanged nuts and blue loc-tite, easier to deal with than separate nuts and washers. The tank could a be a gallon smaller, it is a tight fit.
Installation instructions were below average in my mind. The biggest flaw is right in the beginning when you're instructed to cut he metal filler neck. This is entirely unnecessary and makes the installation irreversible. Don't cut your filler neck, just cut the first hose clamp off and remove the filler neck as one piece. Broadly speaking pre-assemble more pieces prior to putting the tank in than is outlined in the instructions. Attach one of the filler neck unions to the tank, attach the fuel line to the tank, attach the fuel line outlet to the pump. Stuff like that. With skinny arms you can get in there and do it after the fact, but it is a lot harder.
Wiring instructions were just a simple diagram, the rest of it you have to figure out on your own. I chose to put the fuel level indicator and switch on the panel by my right knee and run all of the wiring through the center console and under the carpeting all the way to the spare tire winch access hatch. I stole power from one of the cigarette lighters and left the 5 amp fuse near the transmission emergency release. In some areas I used some 1/4" vinyl tubing as conduit to further protect the wires. For gound I drilled and tapped an m6 hole in the frame. A rivnut would also be a good option here.
I'm not a fan of the path the fuel line takes from the tank to the pump. It completes a full S turn going straight out the top of the tank and down and back up to enter the bottom of the fuel pump. That bottom turn has to be kept tight to keep the fuel line as far from the exhaust as possible. A "u" shaped piece of stainless tubing would be nice here. I can't see another way to mount the pump that would be acceptable. While not a problem with the kit, refitting that fuel door assembly was challenging.
I tested it with a couple gallons of gas and everything seemed to work okay so I went to the gas station to fill up. On the drive over I got a loose filler cap warning. I cleared it with the GAP tool, but it persisted. On the drive home I transfered about 8 gallons to the main tank. I placed a latex glove over the filler and refit the cap. When I went out later the error was gone. I'll eventually find out if it was the glove over the neck or that the system now had a good amount of fuel in it so there was less volume to pull a vacuum on.
The small gas tank combined with the poor fuel economy really is a bit of an Achilles heel on these. Being able to go well over 500 miles between gas stops is going to be really nice.
If you do this yourself my recommendation would be to order the following parts.
McMaster 90427A140 M10x1.25 flanged nylock nuts
McMaster 9895K13 Solder-loaded heat shrink butt splices
McMaster 9983K15 Solder - crimp ring terminal
Additional 5/16 fuel line (4 feet)
Additional 5/8" fiber reinforced vinyl tubing (1 foot)
Assortment of appropriatly sized stainless hose clamps
wire brushes and rust converting paint
At some point I'll add some pictures.