Help in identifying part - Timing Chain Service

Disclaimer: Links on this page pointing to Amazon, eBay and other sites may include affiliate code. If you click them and make a purchase, we may earn a small commission.

weezer

Member
Joined
Dec 11, 2024
Posts
11
Reaction score
12
Location
06897
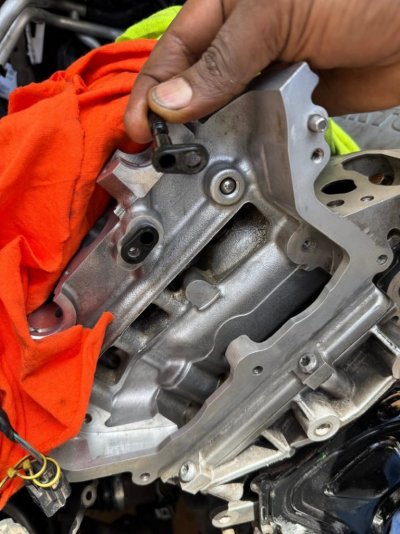
@rover range can't thank you enough for the help. I pulled the part out and confirmed it is the oil restrictor that I shared in the ebay link. It's on order! Panic level now returning to a more even and stable level.
 
Last edited:

Land Rover Joe

Full Access Member
Joined
Apr 10, 2011
Posts
136
Reaction score
12
Dear @weezer – thanks for posting and creating a very helpful thread!

Dear @Rover Range – always helpful and thanks for assisting the tribe with your knowledge and experience!

The photograph is what I found on the back of the cylinder heads (look familiar!?!) ….so seems like I will now be ordering some (more) items from Parts Geek soonest.

However, I am curious about the 2011 Service Bulletin mentioned by @Rover Range in another related thread about this part # LR011688 -

https://www.landroverworld.org/threads/oil-anti-drain-valve-in-top-of-engine-block-5-0-lr4.45134/

Is there a reason for this Bulletin? I want to replace this part because it is an oil restrictor (and I would like to free up as much oil as possible) as well as it is this tiny plastic part pretty deep in the engine (and certainly don’t want it to break!) Nothing has broken (yet) but I think prudent to be safe rather than sorry.

Your insights are most welcome!
 

Attachments

  • Oil Restrictor.jpg
    Oil Restrictor.jpg
    92.3 KB · Views: 12

Land Rover Joe

Full Access Member
Joined
Apr 10, 2011
Posts
136
Reaction score
12
Thanks @weezer!

Most excellent!

I just ordered three (an extra just in case...!) from Parts Geek. I had good luck with PG on a previous order, they have them in stock, so am going with PG again and will see what happens.

Meanwhile, the cylinder heads went back on today and got torqued to spec (photo below after wrapping up this afternoon including a friend underneath putting in new O2 sensors after finishing the exhaust headers reinstall).

So we will now have to wait for all the last minute parts I had not expected (these silly Oil Restrictors, two new High Pressure Fuel Pumps (why not?), another new (OEM this time) Water Pump...). We will therefore instead start working on suspension and brakes.

Now transitioning to the brake rebuild after fitting new control arms & hardware, links, bushings, and hubs+bearings to include some snazzy gloss black paint to spruce things up...
 

Attachments

  • 5 May 2025_1.jpg
    5 May 2025_1.jpg
    165.7 KB · Views: 8
  • 5 May 2025_2.jpg
    5 May 2025_2.jpg
    133.9 KB · Views: 8
  • 5 May 2025_3.jpg
    5 May 2025_3.jpg
    154.8 KB · Views: 6

weezer

Member
Joined
Dec 11, 2024
Posts
11
Reaction score
12
Location
06897
Wow, that looks like an incredibly intense project yet highly satisfying in the end. Best of luck. FYI, my experience removing the old oil restrictors was simple enough. However, inserting the new oil restrictors caused me some anxiety as they were tough to push in. On the first one I though I might break it or better yet get it stuck (permanently). I ended up dipping each in motor oil, aligning the bolt holes as best as possible then firmly pushed straight until it popped in (I applied some serious force... what I would normally consider to be too much). I do believe this added friction is caused by the new tolerances but I'm a DIY'er so please take everything I share with a gain of "double checking". ;)
 

Land Rover Joe

Full Access Member
Joined
Apr 10, 2011
Posts
136
Reaction score
12
Wow, that looks like an incredibly intense project yet highly satisfying in the end. Best of luck. FYI, my experience removing the old oil restrictors was simple enough. However, inserting the new oil restrictors caused me some anxiety as they were tough to push in. On the first one I though I might break it or better yet get it stuck (permanently). I ended up dipping each in motor oil, aligning the bolt holes as best as possible then firmly pushed straight until it popped in (I applied some serious force... what I would normally consider to be too much). I do believe this added friction is caused by the new tolerances but I'm a DIY'er so please take everything I share with a gain of "double checking". ;)
Thanks @weezer!

And excellent point. Here is where we are right now -

So, we have put the cylinder heads back on and here is where that pesky oil restrictor is located (the plastic piece). Since these fits behind the camshaft variators on the FRONT of the cylinder heads (I think I accidentally said on the back side of the engine previously), we will have to wait until the new plastic pieces arrive before we can proceed with finishing the timing (this photograph shows the old restrictor which is just placed for testing/fitting; we will replace it with the new ones once they arrive).

Regarding the other plastic valve (on the back of the engine) – we just cleaned everything up and reused it. If I could easily get my hands on one, I would have replaced it but alas…not this time (now I know!). These plastic parts.......

I have a photograph of the other side which doesn't have the plastic part installed yet.

Once we get this resolved, we will be ready to proceed with the rest of the engine rebuild....

Thanks again!
 

Attachments

  • Oil Restrictor on Engine.jpg
    Oil Restrictor on Engine.jpg
    196.2 KB · Views: 5

Latest posts

Forum statistics

Threads
36,730
Posts
222,846
Members
30,900
Latest member
Sid1577
Top