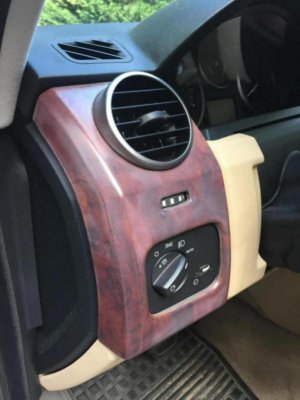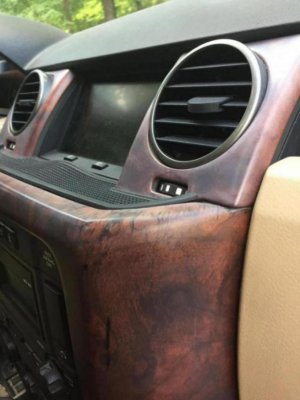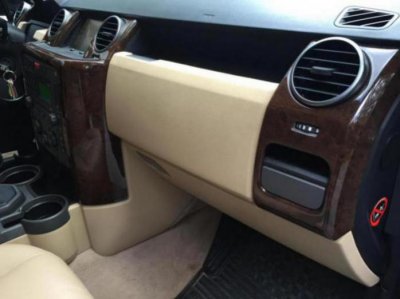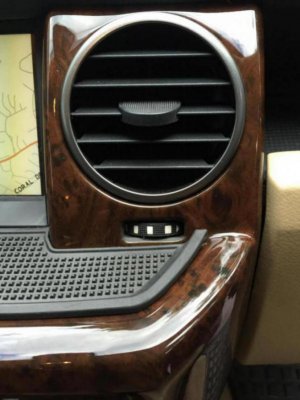

I thought I'd share my experience with adding woodgrain interior trim on my 2006 HSE. Mine had the factory woodgrain kit installed, which is a 5-piece kit that uses a laminate woodgrain with a matte clearcoat. Over time, the clearcoat can turn cloudy, as you can see in the attached pics.
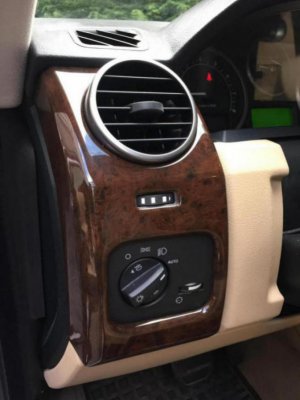
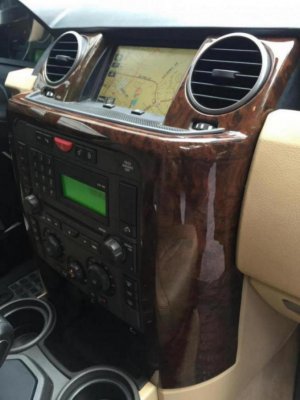
I decided to replace the trim, but the factory trim pieces are extremely expensive ($1-2K) assuming you can find one. Plus, I was worried the same clearcoat issue could occur again. After some searching of aftermarket kits, I found a 3D molded kit online which included the center stack and both vents. This seemed like the best choice for me. I ordered the 3D kit from Sherwood Innovations in majestic burl.
Installation first involved removing the existing 3 trim pieces from the interior, which involves no screws or retainers - just pull straight out while holding near the bottom of the trim piece. The factory wood laminate was adhered to the trim with a type of rubber cement. The laminate could be carefully pried away from the underlying trim piece as long as you worked carefully from one edge. After removal, the rubber cement residue had to be cleaned off with a putty knife and some goo-gone. Of course, if you don't have a woodgrain kit installed, then you won't need this step. Just clean the trim pieces thoroughly to remove stains, dirt or oils from the surface.
Once the trim was cleaned and dry, the new woodgrain could be attached using the 3M tape that was attached to the back. The original factory laminate was a couple of mm's thick, whereas this aftermarket woodgrain was a lot thinner, about the thickness of a playing card. However, it was exactly molded to the contours of the LR3's trim pieces and the fit was great.
Overall I am very happy with the new look. It's a glossy finish, which is taking a little getting used to, since the previous wood was a matte finish, but it is MUCH better then the faded factory pieces!
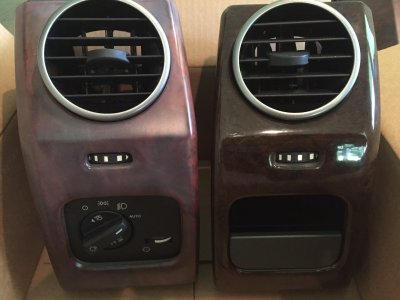
Here are the original factory pieces, which had faded after 10+ years:
I decided to replace the trim, but the factory trim pieces are extremely expensive ($1-2K) assuming you can find one. Plus, I was worried the same clearcoat issue could occur again. After some searching of aftermarket kits, I found a 3D molded kit online which included the center stack and both vents. This seemed like the best choice for me. I ordered the 3D kit from Sherwood Innovations in majestic burl.
Installation first involved removing the existing 3 trim pieces from the interior, which involves no screws or retainers - just pull straight out while holding near the bottom of the trim piece. The factory wood laminate was adhered to the trim with a type of rubber cement. The laminate could be carefully pried away from the underlying trim piece as long as you worked carefully from one edge. After removal, the rubber cement residue had to be cleaned off with a putty knife and some goo-gone. Of course, if you don't have a woodgrain kit installed, then you won't need this step. Just clean the trim pieces thoroughly to remove stains, dirt or oils from the surface.
Once the trim was cleaned and dry, the new woodgrain could be attached using the 3M tape that was attached to the back. The original factory laminate was a couple of mm's thick, whereas this aftermarket woodgrain was a lot thinner, about the thickness of a playing card. However, it was exactly molded to the contours of the LR3's trim pieces and the fit was great.
Overall I am very happy with the new look. It's a glossy finish, which is taking a little getting used to, since the previous wood was a matte finish, but it is MUCH better then the faded factory pieces!
Here are the original factory pieces, which had faded after 10+ years: