Any DIY tips out there on replacing a 2016 LR4 SCV6 Thermostat Housing?

Disclaimer: Links on this page pointing to Amazon, eBay and other sites may include affiliate code. If you click them and make a purchase, we may earn a small commission.

thebruce

Active Member
Joined
Oct 21, 2015
Posts
32
Reaction score
18
Location
San Francisco
Yes, that's it. The part number is also in the video in the beginning in the parts list.

If you can actually get that old thermostat/hose bit please let us all know how!

I replaced the entire lower hose, no sense spending the money and then not replacing.

Note that Rover hoses come with the camps pre-positioned and locked open, that is very helpful.

Depending on your schedule you could try to take it apart and then purchase only if necessary.

I see AB is $150 and I paid, as I recall $250 at the dealership, but then I did not have time to wait and the dealership is literally 2 miles from my place...

Just a quick note about AB, if you are clicking around too fast it is easy to mistakenly purchase after-markets rather than genuine Rover parts.
Always double check !

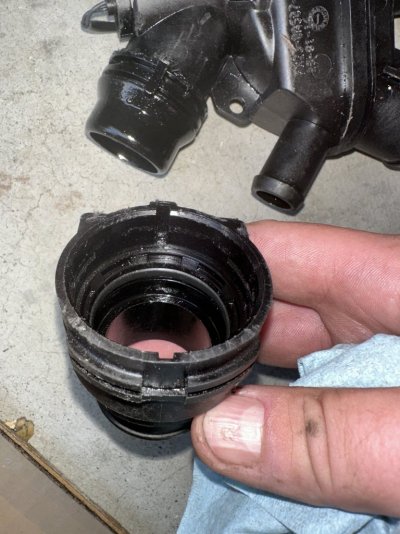
@txfromwi appreciate the video and info. very helpful. I just finished this job today. it wasn't hard, it was just tight space and crappy hose clips that don't lock open. Hose clamp pliers a must. I was able to get the coupling removed with some aggressive persuasion. I asked a mechanic at the dealer and he said they will come off, you just need to work at it. I put some WD40 in the joint then put it in a vice. I tapped around it with a rubber mallet to try to break the seal. I then wiggled back and forth. Then I got a punch and tapped around the edges, then tapped some more. Finally came loose.

I need to bleed it tmrw. I got an air bubble in it. Any tips appreciated.
 

Attachments

  • IMG_3377.jpeg
    IMG_3377.jpeg
    156.3 KB · Views: 38

thebruce

Active Member
Joined
Oct 21, 2015
Posts
32
Reaction score
18
Location
San Francisco
Still having a difficult time getting the system bled. I've tried a couple times and the coolant is rising when I increase the throttle to 2k or 3.5k (and no heat), so I think that means an airlock. It drops back down immediately when I turn the car off.

I followed the instructions incorrectly the first time (because the instructions in the workshop manual suck.) I had all the bleed screws open while the engine was running. I've also not able to get the bleed plug on the cross over pipe off. I was worried I was going to break the clips.

I mostly followed it the 2nd time, still with the cross over bleeder on, but no luck. Im taking it over to a shop to see if them can vacuum it. The dealer wanted $600 for that...


IMG_3374.jpeg


IMG_3377.jpeg


IMG_3372.jpeg


IMG_3373.jpeg
 

f1racer328

Full Access Member
Joined
Apr 18, 2017
Posts
870
Reaction score
467
Location
AZ
You can buy a vacuum bleeder for about $80

OEMTOOLS 24444 Coolant System Refiller Kit, 5 Adapters, Eliminate Trapped Air, Test Radiator and Heating Core Lines for Leaks, Vacuum Fill Coolant Tool, Vacuum Leak Tester, Multi https://a.co/d/4VWuom8

This is the one I have. I’ve only used it once but I don’t have any complaints.
 

thebruce

Active Member
Joined
Oct 21, 2015
Posts
32
Reaction score
18
Location
San Francisco
It worked itself out. I let it sit for a while with the cap off and then by the time I drove it to the shop to get it looked at the heat was working. appreciate all the help.
 

16FujiDisco

Full Access Member
Joined
Jan 20, 2020
Posts
298
Reaction score
138
Location
Nashville, TN
Last time I had everything apart I actually got the bleed started by blowing in the tank with bleed caps off to get the air out; actually worked really well. Then ran the heat full blast to circulate and only had to top off just a bit.
 

mliu2018

New Member
Joined
Aug 26, 2024
Posts
3
Reaction score
2
Location
North America
In my case, the adapter on the bottom of the thermostat did not come off and I needed to purchase the entire hose assembly that goes from the thermostat down to the radiator, that hose assembly was about $250.

It's a standard brutal plumbing problem, just 2 little tips, there is a T-30 bolt that attaches the thermostat to the body, best way to get to that is several feet of extensions placing the socket wrench up at the fender rather than down in there.
And when you get the entire lower hose assembly, check from underneath to be sure you have contained all the bits and bobs in that provided retaining zippy tie, otherwise you can have things rubbing on the serpentine belt if not properly secured.

Here is my video for that entire project.
Skip to 44:37 for the bit about the thermostat and watch to 50:45

Hi,

That is a very informative video. Only wish I have watched it firsts before starting on my thermostat replacement. It would have saved me the 4hr+ and many cuts on my forearm fighting my way to get the lower radiator hose off. The service manual didn't help at all.

The issue I now face is that the little plastic elbow piece from the water pump is broken off and the broken end is still in the water pump. I am hoping that it can be pick out with a pick tool and not requiring changing the whole water pump assembly. Any suggestion?
 

Rover Range

Full Access Member
Joined
Jun 13, 2022
Posts
664
Reaction score
371
Location
Texas
For the piece broken off in the water pump.
Carefully remove the black retaining ring. It just snaps in.
Take a drywall screw and screw it into the broken of piece. Should only take a couple turns, by hand. Then slide out.
Reinstall the locking ring.
 

mliu2018

New Member
Joined
Aug 26, 2024
Posts
3
Reaction score
2
Location
North America
For the piece broken off in the water pump.
Carefully remove the black retaining ring. It just snaps in.
Take a drywall screw and screw it into the broken of piece. Should only take a couple turns, by hand. Then slide out.
Reinstall the locking ring.
Worked like charm! Started with some other type of screws and couldn't get a good bite. Switching to an actual drywall screw, came right out with a few turn.

Any suggestion on how to get the lower radiator house off the thermostat? Re-evaluated the situation over the weekend, it seems replacing this lower portion will be a massive undertaking.
 

mliu2018

New Member
Joined
Aug 26, 2024
Posts
3
Reaction score
2
Location
North America
@txfromwi appreciate the video and info. very helpful. I just finished this job today. it wasn't hard, it was just tight space and crappy hose clips that don't lock open. Hose clamp pliers a must. I was able to get the coupling removed with some aggressive persuasion. I asked a mechanic at the dealer and he said they will come off, you just need to work at it. I put some WD40 in the joint then put it in a vice. I tapped around it with a rubber mallet to try to break the seal. I then wiggled back and forth. Then I got a punch and tapped around the edges, then tapped some more. Finally came loose.

I need to bleed it tmrw. I got an air bubble in it. Any tips appreciated.
I have a fairly stuck clamp. Worked couple of hours on them with WD-40, zero movement.

Did you lose one of the lower metal clamps to get the thermostat with the lower radiator clamp out first and then separating them outside the car?

I was contemplating putting the thermostat back and try pushing from the top with a flathead, but get a good angle seems impossible. I just can't seam to find a good position to put force on them.
 

Latest posts

Members online

No members online now.

Forum statistics

Threads
36,416
Posts
219,803
Members
30,583
Latest member
Guillermo9
Top