ARB dual compressor mounting?

Disclaimer: Links on this page pointing to Amazon, eBay and other sites may include affiliate code. If you click them and make a purchase, we may earn a small commission.

ryanjl

Full Access Member
Joined
Dec 31, 2015
Posts
3,018
Reaction score
1,792
Location
KCMO
Yeah, that's exactly what I had planned to do. Should be pretty easy.
 

ryanjl

Full Access Member
Joined
Dec 31, 2015
Posts
3,018
Reaction score
1,792
Location
KCMO
Well, like virtually every project I undertake, this one took longer than I thought.

If you use the bolt method to install the nutserts, make sure you use grade 10.9. I used a weaker bolt and nut at first, and wound up having to run to the hardware store after the nut cross-threaded on the bolt.

I used 8mm nutserts and bolts.

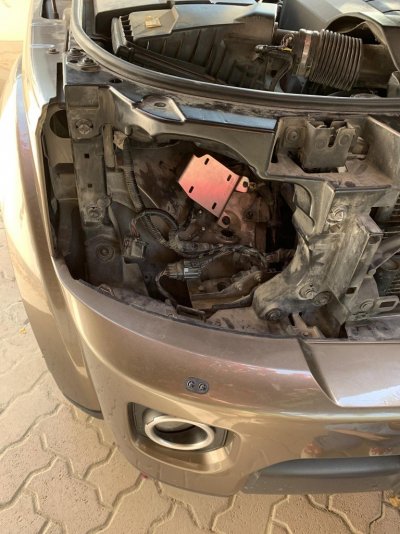
I also thought I could get away without having to remove the headlight, but the lowest nutsert pretty much requires it. Around the same time, I also went ahead and removed the air cleaner box, just to free up all the space.

In terms of how the bracket looks without the compressor installed, it looks pretty much exactly like the image posted earlier in this thread. I started by drilling the upper left bolt, then the upper right, then the bottom right. Part of what took me so long is that I installed the bracket after every nutsert installation to make sure everything was lining up okay. For the bottom right nutsert, the sheet metal sits a bit more vertical. After I drilled the hole, I used my circular file to bend the metal there to be a bit more horizontal.

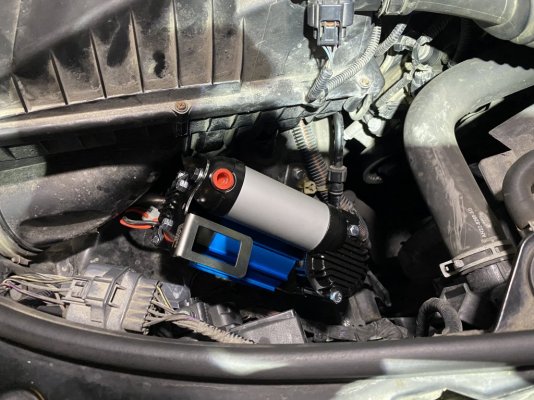
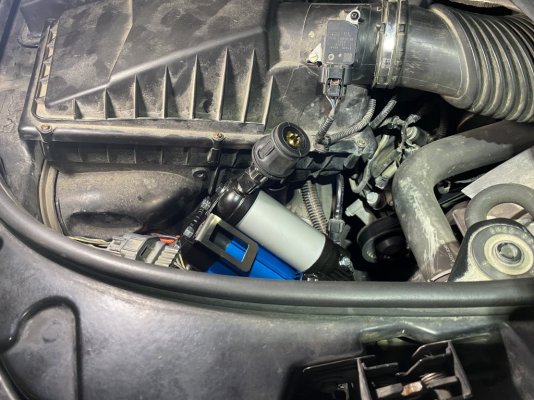
Here is where I am at right now. Still have the wiring to do. The KAON mount for the switch will be nice. The second shot is a mockup of the air connection to see how high it sits.

EDIT: I went ahead and grabbed the image from earlier in this thread in case the guy who posted it decides to take if off imgur. That is not my installation (on the tan LR4), but mine looks pretty identical.
 

Attachments

  • IMG_6402.jpeg
    IMG_6402.jpeg
    175.8 KB · Views: 78
  • IMG_6404.jpeg
    IMG_6404.jpeg
    188.9 KB · Views: 70
  • 4BHJSUe.jpeg
    4BHJSUe.jpeg
    172.2 KB · Views: 71
Last edited:

ryanjl

Full Access Member
Joined
Dec 31, 2015
Posts
3,018
Reaction score
1,792
Location
KCMO
Looking good. Are you going to wire up a switch to the cabin or just leave it on the compressor?

did you use something like these rivnuts?


The switch is going in the engine compartment right next to the compressor. Since I am not running air lockers the switch will be most convenient right next to the air hookup.

I bought the switch bracket from KOAN. In the pictures I posted above, you can see where I later installed the switch (I'll post full installation pictures tonight or tomorrow). The bracket is the silver-colored metal piece that's just below the air outlet in the photo (in the photo, the air outlet still has the red plastic plug installed).

As I found last night, the issue with having the switch right next to the compressor is that it leaves you with a LOT of extra wire, given that the wiring loom was designed to run the switch all the way into the cabin. You are left with things that are almost supposed to be on opposite ends of the loom (switch connections on one end, and compressor/pressure switch connections on the other) and they are going within a few inches of one-another.

I currently have the extra wiring all looped up right now, but I may cut into the harness and clean it all up in the future.

I used rivnuts pretty identical to those. I bought them off amazon too, but the page doesn't exist right now for some reason (which isn't instilling a bunch of confidence in me). The kit I bought had a bunch of different sizes since I didn't know which one would be best, but I'd recommend anyone in the future just ordering 8mm ones.
 

djkaosone

'11 LR4 HSE LUX 5.0L V8
Joined
Oct 26, 2015
Posts
1,012
Reaction score
682
Location
SoCal
I used rivnuts pretty identical to those. I bought them off amazon too, but the page doesn't exist right now for some reason (which isn't instilling a bunch of confidence in me). The kit I bought had a bunch of different sizes since I didn't know which one would be best, but I'd recommend anyone
I'd be wary of the "stainless steel" ones. I found that the scored section of the body are not up to the task. I mounted some with my rivnut gun and accidentally had a badly threaded ss rivnut jam a bolt. I tried to back the bolt up, but the bolt spun the rivnut. Luckily, it was at a spot where I could vise grip the rivnut and remove the bolt. I had to cut that out and replace with a different brand (Astro) rivnut. They are way better.

20210917_090130.jpg
 

ryanjl

Full Access Member
Joined
Dec 31, 2015
Posts
3,018
Reaction score
1,792
Location
KCMO
Yes, I should have said that mine weren't stainless. They were carbon steel, and had the gold tone similar to the ones you posted.

Mine are in pretty solid at this point, so hopefully nothing to worry about.
 

Stuart Barnes

Full Access Member
Joined
Oct 27, 2019
Posts
443
Reaction score
237
Location
Los Angeles
A word for anyone using riv-nuts. If you can use penny washers on either side of the riv-nut it really helps to get a stronger bite. It gives it extra material to grip onto. As the amount of grip you get is from the knurled (scored) portion and where it circumferentially meets the metalwork of the vehicle. There’s a minimum and maximum thickness usually indicated in the spec sheet for the specific riv-nut you’re using.

As we know the bodywork isn’t that thick so any help we can give to get a good bite on the riv-nut goes a long way.

Mild steel is ok, the golden color zinc coated ones. Stainless is overkill and unless you treat the hole you make in the car body you may get some nice galvanic corrosion down the line.

The installs look great. I may jump in the bandwagon with this later :)
 

ryanjl

Full Access Member
Joined
Dec 31, 2015
Posts
3,018
Reaction score
1,792
Location
KCMO
I finally bit the bullet for a few reasons. Checking the tire pressure in my wife and my cars. Tubeless tires on my mountain bike (which often require a compressor and not a hand pump to set the bead after a tire change). And my wife's inflatable stand-up paddleboard.

I've carried a cheapo portable air compressor for a number of years in the 3rd row footwell, but it's a bit of a PITA to get out and set up. It connects to the battery with alligator clips. This will be much more simple and easy.
 

Stuart Barnes

Full Access Member
Joined
Oct 27, 2019
Posts
443
Reaction score
237
Location
Los Angeles
I finally bit the bullet for a few reasons. Checking the tire pressure in my wife and my cars. Tubeless tires on my mountain bike (which often require a compressor and not a hand pump to set the bead after a tire change). And my wife's inflatable stand-up paddleboard.

I've carried a cheapo portable air compressor for a number of years in the 3rd row footwell, but it's a bit of a PITA to get out and set up. It connects to the battery with alligator clips. This will be much more simple and easy.
That’s exactly the same as me, although the paddle board is mine.
 

ryanjl

Full Access Member
Joined
Dec 31, 2015
Posts
3,018
Reaction score
1,792
Location
KCMO
Well, I had hoped to get some good in-use photos or videos of the ARB on my week-long trip to Trestle bike park, but I used it exactly zero times. Somehow escaped several full days of hitting technical black trails on my mountain bike without blowing a tire (I suppose recently installing cushcore helped). And while I had planned on hitting some offroad trails deeper into Colorado (probably near Crested Butte), we just elected to spend the whole week in Winter Park so that I could wear my *** out mountain biking there instead.

I did use it at home before the trip to check the air in all my tires, but that was boring driveway footage.

I thought it at least would get turned on to air up my wife's standup paddleboard, but she wanted to practice using her manual pump so that she can be confident with it if she ever goes somewhere by herself.

Sad trombone noises.

Anyway, I'll do a "finished" video soon to polish this topic off.
 

Latest posts

Members online

Forum statistics

Threads
36,222
Posts
217,568
Members
30,473
Latest member
OnoA
Top