If anyone needs information on dropping your LR4 tank to replace the fuel pump, let me know...

Disclaimer: Links on this page pointing to Amazon, eBay and other sites may include affiliate code. If you click them and make a purchase, we may earn a small commission.

thebruce

Active Member
Joined
Oct 21, 2015
Posts
32
Reaction score
21
Location
San Francisco
ping me if u guys need more info or when you get into it and I can walk you through it. as I said, would have taken 1-2hrs tops with some proper documentations.
 

txfromwi

Full Access Member
Joined
Dec 18, 2013
Posts
582
Reaction score
309
Location
2013 & 2015 Houston TX. 2016 Montreal, QC
Thanks!

I have a phantom fuel leak at fill-up time that we have been working on for a year now. (It's slow because the truck is away at University and I need to depend on remote dealerships).

Dealerships are at a loss to explain and I know that my diagnostic skills are far superior - but I need the truck in MY garage.
I will most likely need to do this project myself summer 2024, but all this helps me in guiding the dealership in the mean-time, and helps me plan the work in advance, your tips are great!
 

callin

Active Member
Joined
Aug 25, 2021
Posts
42
Reaction score
13
Location
Houston
that's great, thanks so much
that sensor I dont exactly know, but yes its in that vicinity (and I think fairly easy to replace). the dealer replaced that when they did the fuel flange recall, but that didnt help the situation. its in the workshop manual and I can look it up if you need.

for the pump I got the VDO. I think it was like $170. https://www.autohausaz.com/pn/A2C53323174Z

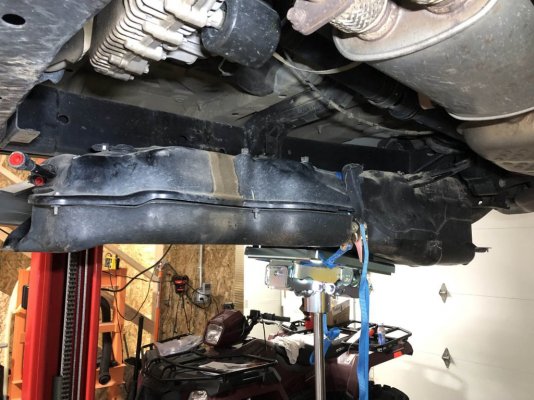
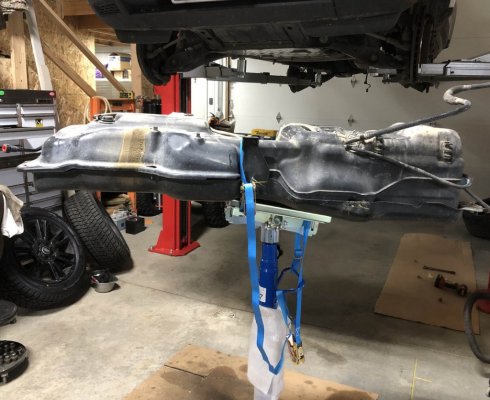
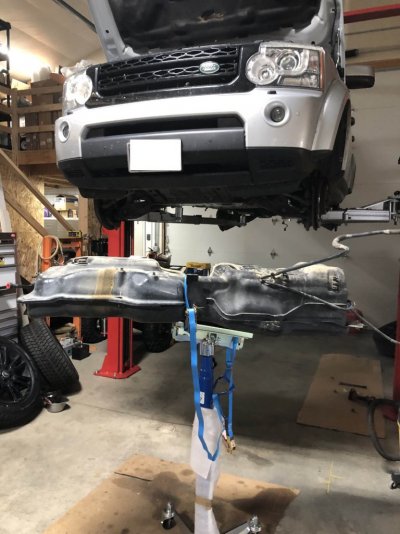
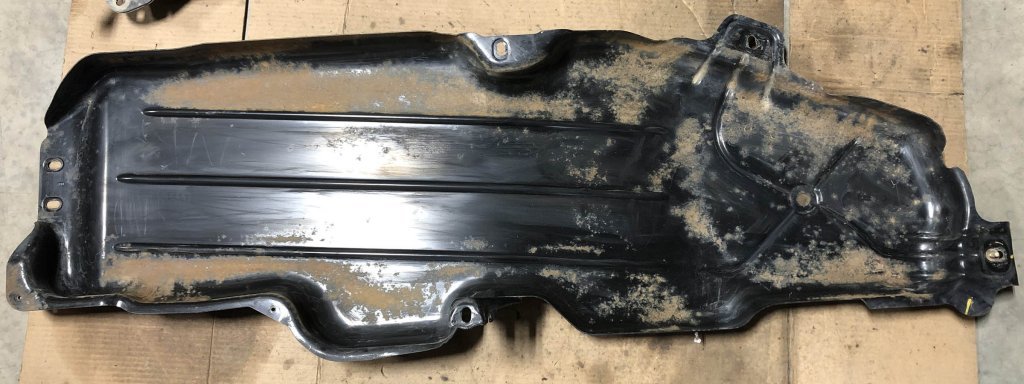
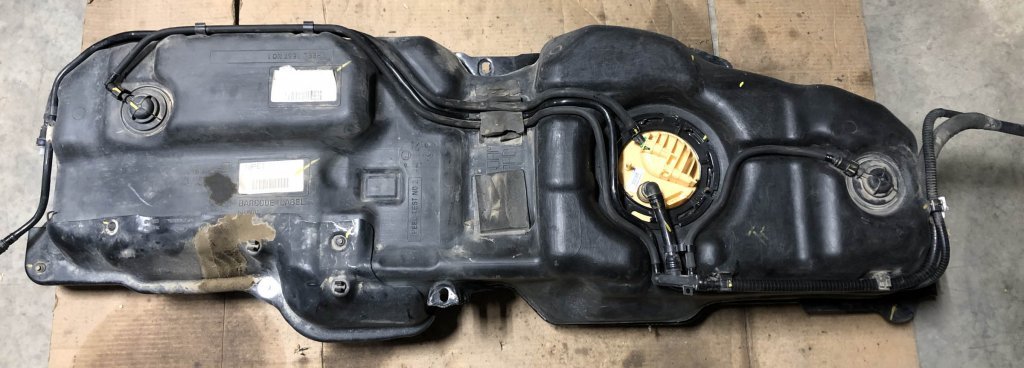
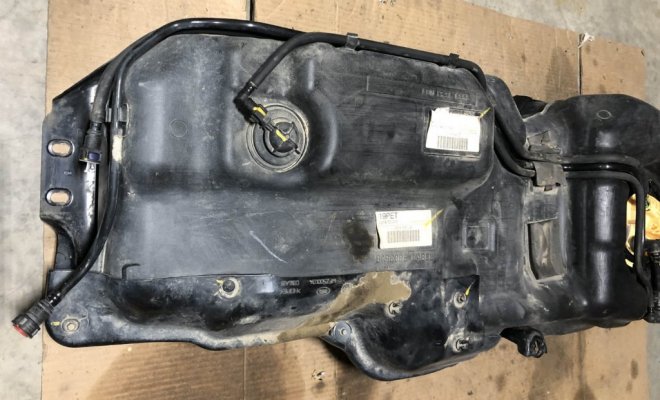
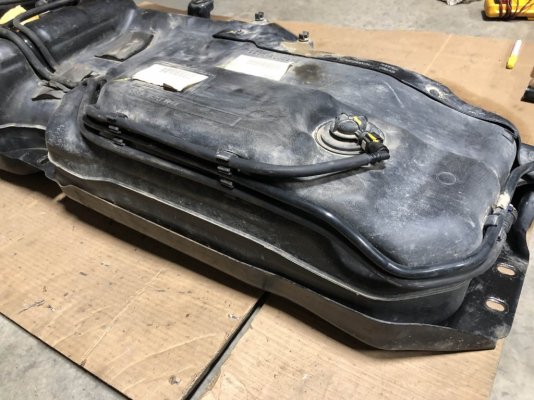
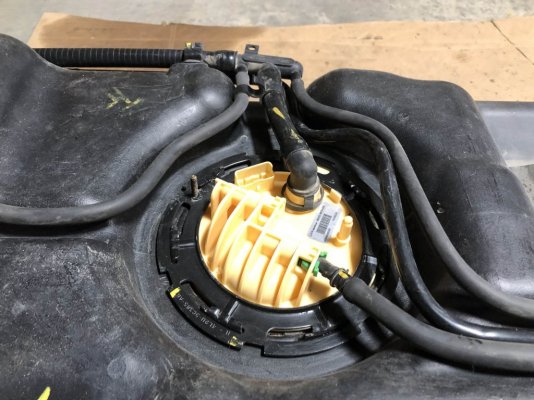
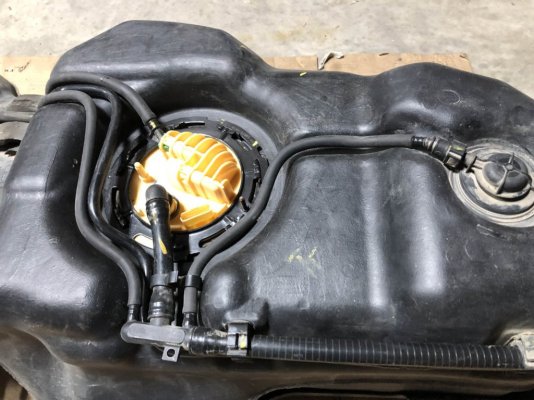
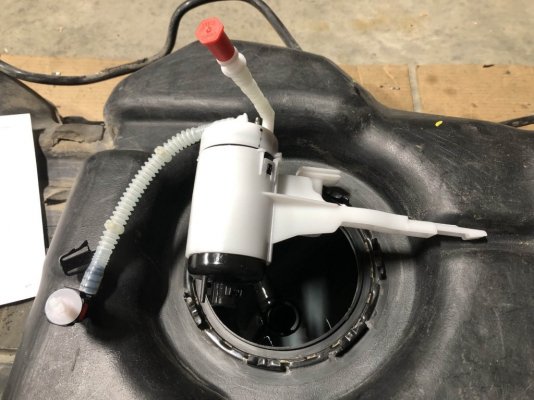
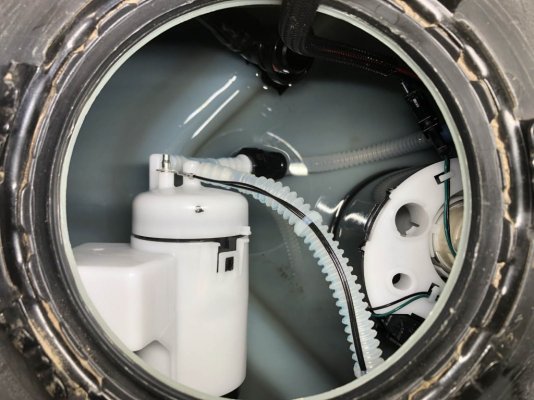
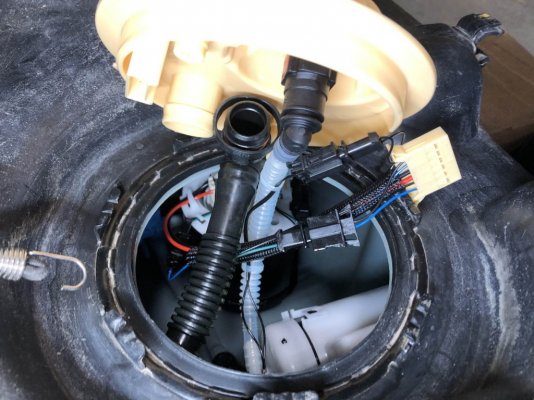
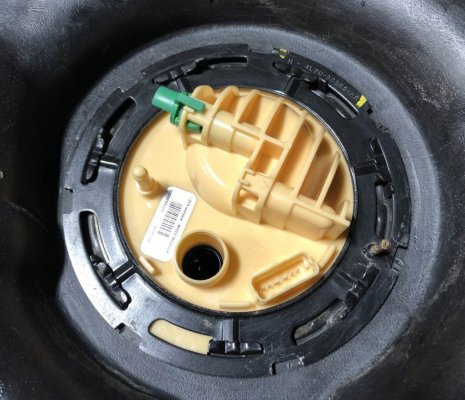
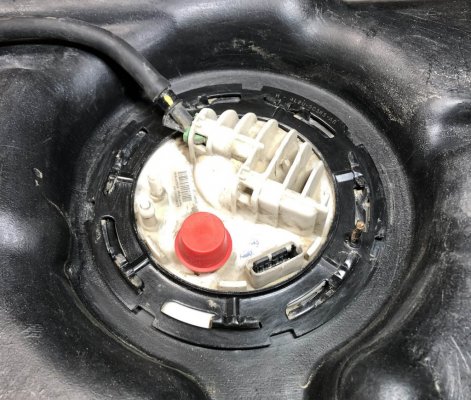
the workshop manual nor any of the videos I saw, including that one you linked show what the inside of the SVC6 tank looks like. caused a lot of confusion for me initially. the fuel filter is mounted on the top of the tank (not attached to the flange like some videos show of the LR3), but directly mounted to the top of the tank. you need to remove that first to get the pump out. the pump looks the same as the videos, but nobody explains you need to twist the pump to unlock it from the mounting clips and then remove the fuel float from the old pump to put in the new pump. I initially mounted my float upside down because I didnt take enough pics pulling stuff out. took me a solid 1+ hour of trying to figure out how to get that fuel filter out, then back in. I was baffled.

but its easy if you know how it all works. I have pics of that fuel filter location and how it's mounted on rubber rails. you just pull it towards you and it slides off the track and then can be removed. install same way (but its hard to see the mounting rails inside the tank so I had to stick my phone down in the gas tank to take pictures to see what I was doing).
this is great thanks. yes, any pics of the process would be greatly appreciated!
 

gsxr

Full Access Member
Joined
May 8, 2017
Posts
778
Reaction score
365
Location
Big Sky Country
I recently pulled the tank for pump replacement, due to a different OBD-II fault code (details in this thread). The info and photos from @thebruce were helpful. The factory service manual (FSM) was generally NOT helpful. I'm shocked at how bad the FSM is. Many steps have no text description, and the color-coded images are often confusing.

My first problem was how to siphon the ~20 gallons of gasoline out of the tank. Since the truck wouldn't run, it was not possible to drive to burn up fuel until it's on reserve. I could insert a hose almost 5 feet down the filler pipe, but the hose won't contact liquid. And it won't go any further than ~4.8 feet down the filler pipe. The V8 FSM is useless, here are the fabulous instructions for draining the tank:

"Remove the fuel from the fuel tank, via the filler neck, using the fuel tank draining equipment. Follow the manufacturer's operating instructions."

After fighting with different size hoses for half an hour, I gave up. The next day I made one last attempt to get the siphon hose into the tank. And it worked! But, I was only able to siphon 6 gallons out (estimated 14 gallons remaining). I'm still not sure what the problem was.

Next was pulling the filler pipe connection. More fuel leaked out than I expected, but the flap at the tank did not leak so it was "only" a few ounces (which is more than it sounds like). With the filler pipe removed, I was able to push the flap open with a screwdriver and drain a pint or two at a time into a bowl, which was then poured via funnel into a gas can. After repeating this a dozen or more times the flow was down to a trickle.

Next was sticking the siphon hose into the tank fill port and siphoning directly out of the tank. Total drained ended up around 17 gallons. I had estimated there was 19-20 in the tank, so draining all but 2-3 gallons was fantastic. This procedure resulted in lots of spilled gas & fumes: work in a well-ventilated area if you have to drain the tank like this, and keep a fire extinguisher handy.

I did not take any photos of the siphon process, there isn't much to show. I used vinyl tubing from Lowes / Home Despot, I tried both 3/8" OD and 1/2" OD. At least a 10' length is required. The flap at the filler neck jams the hose when pulling it out, if you have a helper, they can use a long screwdriver to pry that up while you extract the hose.

If you can drive the truck and get the fuel level low enough to turn on the reserve light, do that instead - saves a lot of messy, potentially flammable work.
 
Last edited:

gsxr

Full Access Member
Joined
May 8, 2017
Posts
778
Reaction score
365
Location
Big Sky Country
Once the tank is near empty, the next trick is getting the tank disconnected and lowered out of the chassis. Those quick-connect pipe fittings are poorly named. More like torture-connect. When you can't easily get your hands/fingers on the fitting, it's a PITA to squeeze hard enough while also twisting/pulling. The front connections are difficult to see or get your hands on. If you lower the tank slightly, access & visibility is improved.

Separating the vent piping at the rear is a similar headache. The large diameter pipe torture-connect fitting is fairly easy to view & access. The small diameter pipe connects waaaay back, buried above/behind the differential & spare tire. Another great example of terrible engineering. This was designed for manufacturing, not for maintenance / service / repair. I was just barely able to get a couple fingers on the small diameter vent pipe above the diff and disconnect it. Extracting this pipe around other pipes / brackets / ties was not fun.

This is where you get to decide if you follow the FSM procedure (as I did), or follow what @thebruce outlined earlier in this thread. If you disconnect the vent pipes from the tank, you may be able to leave the hard-to-access connections alone. Complicating this option, is that the 3 pipes at the tank intertwine and it requires unplugging most or all of them. Be careful, there will be lots of dust & dirt, you don't want any debris in the pipes (especially the fuel delivery line which is POST filtration and feeds the high pressure pumps).

Those stupid pipe fittings, and their location, are just the worst. Clearly, these are connected on the production line with a bare frame, before the body is lowered onto the frame. With the body removed, there's plenty of access. With the body in place, there's very poor access. The FSM is just plain awful with no text descriptions, and not-very-helpful colored drawings. Really frustrating, all JLR had to do was design accessible fittings at the front+rear of the tank, but nope... they had to save those seventeen cents. A pox on those who designed the plumbing, and those approved the design.

Adding insult to injury: Removing the electrical connector at the flange was 10x harder than it should have been. I don't know what JLR was thinking, since you're supposed to separate this with the tank only lowered 250mm (~10 inches). After 30+ minutes of fighting and using a mirror to view the locking tab, it finally released. Just ridiculous. You need a VERY small (tiny, actually) screwdriver or pick to slide down the center of the lock tab, and pry the bottom away from the connector. It is not possible to discern this, until you have the connector removed. And you can't see this in a mirror. Fabulous engineering study of how NOT to design a connection in a limited-access area. *shakes cane*

With the plumbing & harness disconnected, the tank finally came out. I used a transmission jack and strapped the tank to it during removal. A helper is needed to lift the tank down to the floor. If working solo, and engine crane should work. The tank+shield is quite heavy, attempting to lower or raise it 4 feet will likely result in dropping it.

There was a disturbing amount of rocks, dirt, and debris in the metal shield. I pulled the plastic tank out, cleaned up the metal shield, and put the tank back in.

Photos below.
 

Attachments

  • tank_removal1.jpg
    tank_removal1.jpg
    161.6 KB · Views: 21
  • tank_removal2.jpg
    tank_removal2.jpg
    158 KB · Views: 21
  • tank_removal3.jpg
    tank_removal3.jpg
    132.9 KB · Views: 21
  • tank_shield1.jpg
    tank_shield1.jpg
    100.8 KB · Views: 21
  • tank_shield2.jpg
    tank_shield2.jpg
    91.4 KB · Views: 21
Last edited:

gsxr

Full Access Member
Joined
May 8, 2017
Posts
778
Reaction score
365
Location
Big Sky Country
With the tank extracted, I then disconnected the vent pipes from the tank. This is where I ran into additional problems. The so-called quick-connect pipe fittings have no seal to prevent dirt & dust from blocking the movement of the release mechanism. One of the fittings could not be released by squeezing the tabs, I had to use screwdrivers to push the lock ring outward and release the fitting. This would have been nearly impossible with the vent lines still attached to the chassis.

Had I tried the method thebruce described, I don't know if I could have separated the fittings with limited access / visisbility. If you can release all 3 vent connections on the tank, his method may be easier than the FSM procedure. It's worth a try before fighting with the chassis pipe connections, especially the rearmost fitting by the diff / spare tire.

Re-installing the tank via FSM method requires snaking the small vent tube back above the differential, which is not as easy as it sounds. I ended up mis-routing it above a hydraulic line but did not discover this until the tank was bolted in. I wasn't going to remove the tank a second time so I left it mis-routed, and added a spacer clip to keep the plastic vent line from rubbing on the hydraulic pipe. When routed properly, below the hydraulic line, the vent pipe should snap into a clip on the fuel filler pipe.

Getting the vent lines into the brackets at the inside edge and rear of the tank (see photo #3 below) is a challenge via either method. I made the mistake of bolting the tank in place before adding the locking clip at the rear, the lock clip should be installed before lifting the tank all the way up. I could not access this, and left the lock clip off. The pipes shouldn't move, I'm not worried about it.

When installing the tank, I double-checked each quick-connect pipe fitting. Or so I thought. Of course when running the fuel pump priming sequence (thanks for the tip, scapistron!), I heard an odd sound. After a few seconds I figured I should check on that noise, and yup, raw gas was spewing onto the floor. The fuel feed pipe at the front of the tank had not been fully locked in place. Re-connected that and TRIPLE checked, and all was fine.

The other 3 pipes are all vents, and of course the one I messed up on had to be the pressurized fuel line. D'oh! o_O


Photos attached below show the tank cleaned up and ready to re-install. These may help identify the routing of the pipes if you didn't take pics during removal.
 

Attachments

  • gas_tank1.jpg
    gas_tank1.jpg
    82 KB · Views: 20
  • gas_tank2.jpg
    gas_tank2.jpg
    128.1 KB · Views: 20
  • gas_tank3.jpg
    gas_tank3.jpg
    154.2 KB · Views: 19
  • gas_tank4.jpg
    gas_tank4.jpg
    156.5 KB · Views: 19
  • gas_tank5.jpg
    gas_tank5.jpg
    149.6 KB · Views: 18
Last edited:

gsxr

Full Access Member
Joined
May 8, 2017
Posts
778
Reaction score
365
Location
Big Sky Country
I'll post a separate thread with info about the pump replacement. This is fairly straightforward, although not fun due to limited space, short wires, and short pipe lengths.

Note the old, original design tank flange has the non-replaceable filter integrated into the flange. The updated flange (for the TSB related to a cracked flange & fuel leak) is completely different, and relocates the filter to a bracket inside the tank. The old & new flange, and old & new filter, are not interchangeable.

I'll post another thread with photos of all the TSB parts, since most people have this done under warranty at the dealer, or get reimbursed for indy shop replacement. I have no dealer nearby and no shop I'd trust, and since I had it all apart in front of me, it was easier to just spend the $200 and do it myself. I got detailed photos of all the new TSB parts.

Teaser pics below of the new-style filter+bracket that goes inside the tank, and new flange without the integrated filter.
 

Attachments

  • filter_new1.jpg
    filter_new1.jpg
    134.6 KB · Views: 15
  • filter_new2.jpg
    filter_new2.jpg
    124.9 KB · Views: 20
  • flange_new1.jpg
    flange_new1.jpg
    156.6 KB · Views: 16
  • flange_new2.jpg
    flange_new2.jpg
    181.5 KB · Views: 18
  • flange_old.jpg
    flange_old.jpg
    214.2 KB · Views: 17

gsxr

Full Access Member
Joined
May 8, 2017
Posts
778
Reaction score
365
Location
Big Sky Country
Follow-up about the quick-connect fittings on the fuel hose, and vent tubing. I figured there must be special tools to make this easier. I found the Lisle pliers shown below for ~$20 each, and have both coming from Amazon, for the next time I have to deal with these fittings. In tight spaces I had an extremely hard time squeezing the tabs hard enough to release them. Even with the tank removed, I had trouble with the vent connections at the rollover valve on each end of the tank (as previously described).

If there's enough room to get the pliers on the fitting, this should make disconnecting the pipes much easier. I hope.

Lisle 37160 Disconnect Pliers, 85°​


Lisle 37140 Disconnect Pliers, 45°​


71wZutPhJvL._AC_SL1500_.jpg
 
Last edited:

scapistron

Full Access Member
Joined
Aug 30, 2023
Posts
210
Reaction score
135
Location
Massachusetts
I've had decent luck with hose grip pliers. Really need to be careful with them though, can easily crush the plastic.
 

Members online

Forum statistics

Threads
36,619
Posts
221,779
Members
30,781
Latest member
Jamesc909
Top