Write up: High Pressure Fuel Pump (HPFP) Replacement

Disclaimer: Links on this page pointing to Amazon, eBay and other sites may include affiliate code. If you click them and make a purchase, we may earn a small commission.

Pfunk951

Full Access Member
Joined
Mar 5, 2016
Posts
333
Reaction score
242
Location
KCMO
I would say a touch under as much as you should put on a oil plug.. Sorry for the lack of technicality, but it was too tight for a torque wrench and I tried to reverse about how much torque it took to break them loose.. They are indeed on there, and I was balancing "tight" with "don't snap it off in the block".. The fuel lines were about 1/4 turn past hand tight- you can check for leaks once you button up the stuff under the hood, and get the belt back on.

Hope this helps,

Mike
 

Shazam

Member
Joined
Feb 23, 2025
Posts
6
Reaction score
6
Location
Virginia
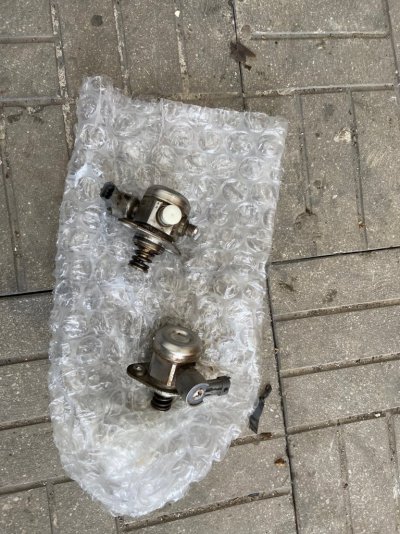
Just finished replacing my hpfps! What a job! Fortunately this thread, along with others made it very doable for someone comfortable with routine maintenance.

This thread describes essentially the exact problem I had: https://www.landroverworld.org/threads/common-fuel-pressure-issue.45332/

My truck is a 2012 with 107k. It had several previous owners who likely ran regular through it and didn’t necessarily give it the TLC it deserves. I had chains/tensioners done about 5k ago. I decided based on others experience that I wouldn’t need bother with the sensor as it seems to rarely fix the problem and it is in an extremely tough spot to get to.

If you follow the methodology in the first two posts of this thread you will be good to go. This thread about alternator removal helped (torque specs included): https://www.landroverworld.org/threads/howto-diy-lr4-alternator-replacement.28780/

Additionally, this thread has some factory manual excerpts and some more specs: https://www.landroverworld.org/threads/high-pressure-fuel-pump-question.41999/

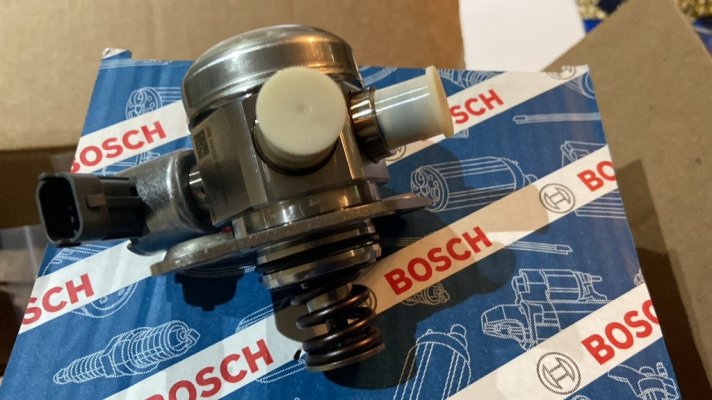
For the record I did not replace the fuel lines, but I did replace the tappets (cam followers).

A couple additional lessons/tips I learned: Before you start, pull the fuel pump fuse/relay in the right fuse box by the battery (they have a gas pump on the fuse box diagram). Then try and start the car for a couple cranks to reduce the pressure/amount of fuel in the lines.

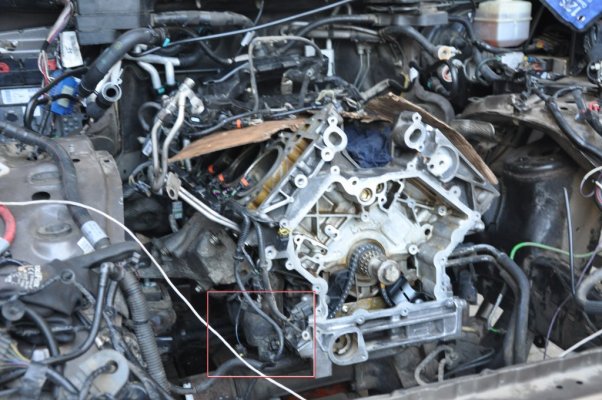
I did not remove the manifold or the fan shroud. I released the serpentine belt tensioner from below. With just the top engine cover removed you have enough room to access the crossover fuel line to relieve the pressure.

I also was one of those guys who tried to skip steps to try and minimize the tear down/re-build timeline…apart from the manifold and fan housing (your discretion), just do it how @Pfunk951 said. I tried not to remove the wheel well liner and while I was able to get the alternator out, I eventually did just go ahead and remove it to give better visibility around the pumps and removing the alternator would have been way easier with it removed….

The antenna described on the back side of the wheel well liner is attached with the two Phillips screws on the front side of the liner. If you don’t loosen those you may pull the antenna out accidentally so be aware (pics attached)

1740956042926.jpeg


On the subject of the alternator…removing the pulse width modulation plug from the back of that thing was the hardest part bar none. I definitely thought I was going break the singe wire attached to the plug. I tried prying with a screwdriver, I tried pushing down the tab while pulling with gloves, I tried needle nose pliers…then I tried a small pair of regular pliers which fully depressed the tab and provided enough grip to pull the connector out.
 

Shazam

Member
Joined
Feb 23, 2025
Posts
6
Reaction score
6
Location
Virginia
Once I got the pumps out I was surprised how dirty the mounting surface is.

1740956201687.jpeg


The seal (P.S. you don’t need the “extra” washer that sometimes pops up in the “you might also need this” section when you are buying the pumps, they come pre-installed) contacts the inside of the block, not on the vertical surface but I chose to clean up that area with a bit of wet 1000 grit sand paper anyway.

Happy to answer any questions to make it easier for the next guy. Truck started right up after the swap I’ll post my GAP tool screen shots below.
 

Land Rover Joe

Full Access Member
Joined
Apr 10, 2011
Posts
190
Reaction score
22
Ladies and Gents,

This is a most excellent and useful thread - so many thanks for your contributions and initiative.

I will say that this thread, and some additional research, motivated me to replaced the HPFP's on my 2010 LR4 HSE (5.0L V8). This is only one piece of a much larger job, but while I originally thought (those Bosch things will last another 100,000 miles)...I decided while the engine was out and the bay was cleared that I would just go through with it.
 

Land Rover Joe

Full Access Member
Joined
Apr 10, 2011
Posts
190
Reaction score
22
For some background - my LR4 is now 15 years old and has 90,000 miles (some pretty hard) on it. I have already had to replace one low pressure fuel pump (the gas tank sending unit) for reasons I suspect had to do with some bad fuel or something.

However, I have gotten better about using more reputable stations (even in Africa) and have always put the highest octane / quality gasoline in as well as use various fuel system cleaners and detergents all the time.

One of my hero's, the Oil Geek, is a big fan of fuel detergents and additives and I would say I agree with him (but I am not the scientist). For example, his latest episode discusses this very topic in detail:


Land Rover Joe

Full Access Member
Joined
Apr 10, 2011
Posts
190
Reaction score
22
That said, my HPFPs looked pretty good - better than I expected:
 

Attachments

  • Old High Pressure Fuel Pumps.jpg
    Old High Pressure Fuel Pumps.jpg
    244.4 KB · Views: 3

Land Rover Joe

Full Access Member
Joined
Apr 10, 2011
Posts
190
Reaction score
22
For Us, this job was far, far simpler since we already had the whole engine bay torn down so for those curious where the pumps are on the engine (underneath their black protective hood/covers) and what it looks like - check out the box I drew indicating their location:
 

Attachments

  • HPFP on Engine.jpg
    HPFP on Engine.jpg
    160.8 KB · Views: 4

Land Rover Joe

Full Access Member
Joined
Apr 10, 2011
Posts
190
Reaction score
22
Thanks again to everyone who contributed to this great thread and all the really detailed and helpful posts! This is a great example of the power of this forum!
 

Latest posts

Members online

Forum statistics

Threads
36,738
Posts
222,994
Members
30,907
Latest member
STQAddie91
Top