2016 LR4 Coolant Crossover, Water Pump, Thermostat Replacement

Disclaimer: Links on this page pointing to Amazon, eBay and other sites may include affiliate code. If you click them and make a purchase, we may earn a small commission.

fireangel1313

Active Member
Joined
Jun 11, 2019
Posts
40
Reaction score
34
Location
Shawnee
After fixing the leaking bleed valve I found that the small elbow going into the water pump was actually leaking worse than the bleeder! I had a heck of a time trying to get the leak stopped while I was waiting on a new elbow. I eventually used outdoor clear silicon caulk around it. This goes against everything I believe in but it worked! Actually worked so well I may not swap out the we part. I will eventually but I kind of want to see how long the silicon holds.


Sent from my iPhone using Tapatalk
 

greiswig

Full Access Member
Joined
Mar 1, 2021
Posts
559
Reaction score
220
Location
Oregon
Actually worked so well I may not swap out the we part. I will eventually but I kind of want to see how long the silicon holds.

Your call, but with respect...I wouldn’t do that. Silicone isn’t intended for pressure, especially as applied to the outside of a part. And the cost of a sudden total failure is too high.
 

timc930

Full Access Member
Joined
Nov 13, 2018
Posts
247
Reaction score
103
Location
Mt P SC
Your call, but with respect...I wouldn’t do that. Silicone isn’t intended for pressure, especially as applied to the outside of a part. And the cost of a sudden total failure is too high.

+1 on his advice.
 

SlimPickins

New Member
Joined
Jan 20, 2021
Posts
2
Reaction score
3
Location
Los Angeles
I just finished this job as well on my wife's 2014 RRS HSE (same 3.0L SC engine as the LR4) with 68k miles on the clock. The front lower crossover pipe was completely separated from its footing insert like the OP's and the valley of the block was filled with nice orange coolant. My experience:
TAKE LOTS OF PHOTOS to ensure things make it back to where they once lived, particularly the rear of the SC and the alignment of the black bracket and the two metal braces that make it up. More on that..
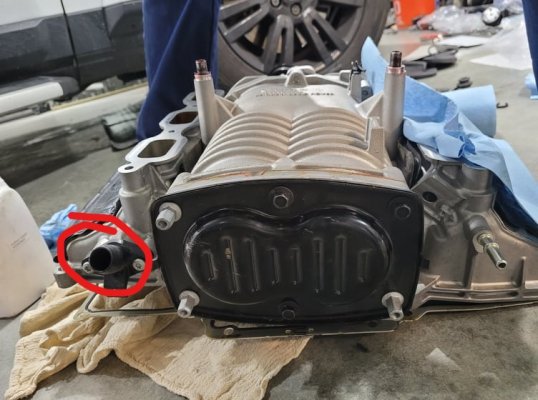
-Took some trial and error to find the fuel pump relay, remove, start and run vehicle until it stalls to depressurize the high pressure fuel lines which will need to be removed.
-Draining coolant is messy. Always.
-Thermostat and housing were a chore due to difficulty getting to and securing the clamps in an open position and getting the hoses off of the plastic housing. They've been on a while through many heat cycles. Get the specialized 24" flexible hose clamp tool, $20 Amazon.
-Supercharger removal was a bear but with patience, side to side rocking and CAREFUL prying along the sides with a small pry bar it did come loose from the two rusty perches. The AMAZON lift mentioned by others was sold out. Harbor Freight has one as well but it wasn't available to me locally. It would have really helped with removal and re installation as I did this solo.
-As stated, be careful of the little, fragile plastic knock sensors which sit VERY close to the SC perch.
-The back of the SC has a rectangular plate with the infamous black bracket secured at three of the 4 corners of the rectangular plate Getting your hands back in there to align AND fit AND turn the L-style torx wrench (25?) was the most time consuming and annoying portion of the job for me, particularly the lower left torx if I recall correctly. This needs to come off before the SC can be removed. Some people have removed the wiring, hoses etc that the bracket supports and then removed the bracket still attached to the rear of the SC but I found this to be more complicated than it was worth. I may have been wrong.
-The rear crossover pipe was pretty straightforward.
-Change SC oil, 5.1oz of the AC Delco SC fluid, two 4oz bottles required.
-Clean the SC and change the coupler in the snout. I got a rebuilt snout with new coupler and pulley off ebay, OEM only! Return your old one for a core refund.
-There will be a very small (1-2mm) gap where you connect the foot of the new upper pipe to the neck of the lower crossover pipe. That's normal. The upper pipe fits far enough into the lower pipe's neck for a secure fit.
-Copper anti-seize to the SC perch and hole for the next guy or the next time...
-Definitely get the hardware to make the gasket/SC guide pins as mentioned by the OP. Cheap from Home Depot, grind the heads off with Dremel or similar. It'll make aligning the gaskets and the SC so much easier when placing it back onto the block.
-The SC needs to be re installed as a unit en bloc. You can't really separate the SC into its componenets and reinstall piece by piece. There is a 10mm bolt on the underside of each side that you can't access once the center portion of the SC is in place.
-Button back up, insert fuel pump relay, fill and bleed coolant system.

A huge thanks to all on here, particularly jlglr4.
 

ausphil

New Member
Joined
Apr 8, 2019
Posts
4
Reaction score
2
Location
British Columbia
Have a recent coolant leak (a month after CPO warranty is up), seems to match descriptions of the front crossover pipes, in my wife's LR4 so attempting this soon. I've read a lot of the related videos/DIY instructions and am feeling fairly confident. One question I have is that I've seen both 3.4oz and 5.1oz of SC oil mentioned for the change, can anyone confirm the actual fill volume?
 

jlglr4

Full Access Member
Joined
Mar 19, 2019
Posts
941
Reaction score
486
Location
Northern California
I believe the LR4 3.0 AJ126 motor has an Eaton TVS R1320 supercharger. Eaton published a fill chart for various cars listing the supercharger model - the AJ126 is not listed, but the Audi seems to use the same supercharger and shows 5.2 oz as the fill volume. https://superchargersonline.com/2011/08/31/eaton-supercharger-oil-chart/. That’s the only info I have. Maybe someone else can chime in.

The other thing you can do is extract and just put back the same amount that you extracted - that assumes, of course, no leak.
 

Michael Gain

Full Access Member
Joined
Dec 8, 2018
Posts
612
Reaction score
283
Location
Clarksville, TN
Have a recent coolant leak (a month after CPO warranty is up), seems to match descriptions of the front crossover pipes, in my wife's LR4 so attempting this soon. I've read a lot of the related videos/DIY instructions and am feeling fairly confident. One question I have is that I've seen both 3.4oz and 5.1oz of SC oil mentioned for the change, can anyone confirm the actual fill volume?

Reach out to @Fuji4 he went through this same dilemma and recommends the 3.4oz if I remember right.

Post #55: https://www.landroverworld.org/threads/supercharger-rattle.40684/page-6
 

SlimPickins

New Member
Joined
Jan 20, 2021
Posts
2
Reaction score
3
Location
Los Angeles
I had the same dilemma. The link given by jlglr4 (post #36) was written in 2011 so I wasn’t sure if our model of SC was produced at that time. If I recall correctly, further digging lead me to a couple of references that did state 5.1oz. When I looked up the models that referenced 3.4oz, the SC unit looked different than ours. Ultimately I went with 5.1oz. It’s only been a few weeks and so far, so good. Fingers crossed. Anyone else?
 

ausphil

New Member
Joined
Apr 8, 2019
Posts
4
Reaction score
2
Location
British Columbia
I didn't end up changing the supercharger oil after all; next time. Have replaced the lower crossover pipe, rear crossover pipe, water pump, serpentine belt, thermostat, PCV valve. Reinstalled supercharger but I can't seem to figure out from my progress photos, what was attached to this port at the rear passenger side of the supercharger - anyone help me out?
 

Attachments

  • 234850705_547810886648790_4577623321958008946_n_LI.jpg
    234850705_547810886648790_4577623321958008946_n_LI.jpg
    386.7 KB · Views: 80

Michael Gain

Full Access Member
Joined
Dec 8, 2018
Posts
612
Reaction score
283
Location
Clarksville, TN
I didn't end up changing the supercharger oil after all; next time. Have replaced the lower crossover pipe, rear crossover pipe, water pump, serpentine belt, thermostat, PCV valve. Reinstalled supercharger but I can't seem to figure out from my progress photos, what was attached to this port at the rear passenger side of the supercharger - anyone help me out?

I just went through all of my pictures. I don't remember it attached to anything; and, in the pics with the sc removed, there was nothing to attach to it. If I remember correctly, it's completely blocked off.
 

Latest posts

Members online

Forum statistics

Threads
36,259
Posts
218,004
Members
30,496
Latest member
washburn72
Top