2016 LR4 Coolant Crossover, Water Pump, Thermostat Replacement

Disclaimer: Links on this page pointing to Amazon, eBay and other sites may include affiliate code. If you click them and make a purchase, we may earn a small commission.

jlglr4

Full Access Member
Joined
Mar 19, 2019
Posts
933
Reaction score
478
Location
Northern California
There is no part number that I know of. LR doesn’t sell just the isolator. They want to sell the whole snout.

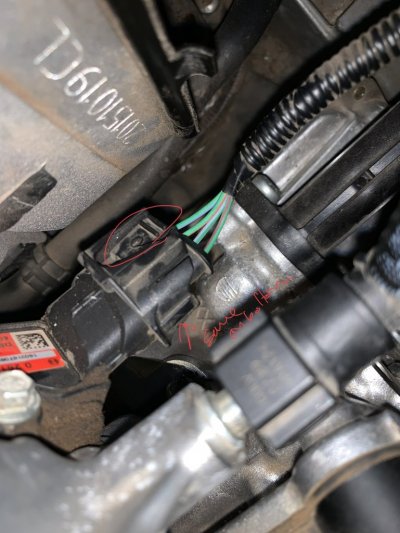
The snout is just the front part of the sc with the pulley front drive shaft and drive shaft housing. It bolts onto the body of the sc (and is sealed with RTV). The throttle body is actually connected to part of the snout. The isolator is just a small plastic coupler that connects the drive shaft in the snout to the drive shaft in the body.

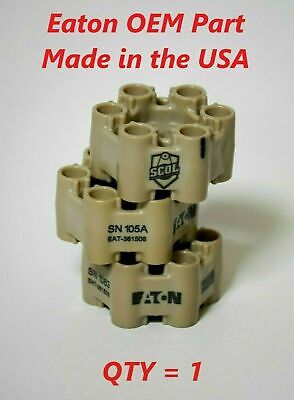
This looks like the part I bought: https://superchargersonline.com/product/eaton-supercharger-isolator-coupling-ls9-lsa-engine-09-14/. But I didn’t buy it from them and I don’t have my part number, so I can’t confirm fitment for you. Not sure if eaton made different sizes or not.
 

txfromwi

Full Access Member
Joined
Dec 18, 2013
Posts
498
Reaction score
250
Location
2013 & 2015 Houston TX. 2016 Rochester NY
SC Questions..

(I posted a question to superchargersonline about 3 weeks ago - no response yet.)

Sounds like standard RTV, used cautiously is the gasket material - any other strong opinions?
Any info on the torque specification of the snout bolts and a torque order?
 

jlglr4

Full Access Member
Joined
Mar 19, 2019
Posts
933
Reaction score
478
Location
Northern California
I can't remember what I torqued to, or where I found the info. If you search up eaton supercharger snout torques, you're bound to find some numbers. The eaton spring coupler was a big issue on GM cars and lots of folks replaced. It's not a high-torque or torque-critical application (to my understanding). The snout is just a housing for the shaft, it's not part of the air chamber.

I used red RTV, but I think black would be just as good. Use sparingly so it doesn't squeeze out too much into the interior cavities. I doubt it would do much, but best to keep it to a minimum Since it is just spreading across two machined faces, very little is needed.

As for superchargers online, just call them. I seem to remember sending an email and getting no response. I called and they picked up right away. Though a lot has changed since then with the workforce (or lack thereof).

But - just checked eBay and I believe quality superchargers must have the part back in stock. This is the kit I bought: https://www.ebay.com/itm/1242330275...entrq:f830314a1800a45ea8e283f4ffffe0fe|iid:14.
 

txfromwi

Full Access Member
Joined
Dec 18, 2013
Posts
498
Reaction score
250
Location
2013 & 2015 Houston TX. 2016 Rochester NY
Ordered the coupler and red RTV last night.

It's going slowly, but surely.

SO...

Electrical connector on the back(firewall) drivers side of the air intake/supercharger.

How the ^&*^& does this come apart??

And as much as I love you all, if anyone says just squeeze and pull, I will hunt you down and gut you like a fish!!

I can attest that pressing in at the two parallel white lines at the "bottom" of the connector does not work, so if that's how it's supposed to work, where do I pry??

VERY SPECIFIC instructions PLEASE. Pry exactly here... Press exactly here...

THANKS!

I am very close to just cutting the wires and then adding in a splice...

Here is a photo, in a mirror...
Capture.JPG
 

jlglr4

Full Access Member
Joined
Mar 19, 2019
Posts
933
Reaction score
478
Location
Northern California
I‘m thinking there is a tab on the bottom side that grabs a cleat (you pry away from the plug gently to release). I‘ll try to get out and look at mine in the next hour or so - see if I can get a pic with the borescope.
 

jlglr4

Full Access Member
Joined
Mar 19, 2019
Posts
933
Reaction score
478
Location
Northern California
Well, I got in there and took a peek with the borescope. Tough to get a visual and tougher still to get a picture. All I have is the top side of the sensor (attached but I could see the bottom side and I’m pretty sure it’s got a tab and cleat on the bottom just like on the top. I believe you need to push the tabs in (squeeze the tabs) on both top and bottom, then wiggle it as it has the moisture prevention gaskets in there that will create a suction as you pull. I remember having a tough time with that plug as well, but after i got it off, I couldn’t figure out why it gave me so much trouble.
 

Attachments

  • FC8F650B-33CB-46FA-93EB-6C233815A418.jpeg
    FC8F650B-33CB-46FA-93EB-6C233815A418.jpeg
    135.2 KB · Views: 54

cjm41

Well-Known Member
Joined
Jun 12, 2021
Posts
48
Reaction score
40
Location
San Diego, CA
SC Questions..

(I posted a question to superchargersonline about 3 weeks ago - no response yet.)

Sounds like standard RTV, used cautiously is the gasket material - any other strong opinions?
Any info on the torque specification of the snout bolts and a torque order?

I can confirm fitment of supercharger isolator/coupler (EATON SOLID LSA/LS9 COUPLER) EAT-361506 from Superchargers Online.

There is conflicting info in Jag/LR forums about which couplers are noisy, which ones are faulty. There is conflicting info about “if it’s snug, file it down because it will make noise” against “no you want it to be snug” I can also confirm you should put it on snug, and it most definitely is not noisy in the least.

A lot of the decisions I made when i came across questionable info were based on being a decent weekend warrior who’s been tinkering (to include building engines) since the late 90s, and being able to text my brother who’s a master tech with 20 years experience like he was my personal engine consultant haha.

The gasket maker you want is Permatex Ultra Black (oil resistant). Says it’s “OE spec” (whatever that means in this case). Somewhere on a jag forum, someone ordered that small pulley snout from the dude in PA and were provided with Permatex Ultra Black by him, who does these snouts every day for a living.

(Gasket application shown below)

Snout bolts are tightened to 27Nm.

The one bolt inside the snout gets a dab of blue Locktite then tighten to 27Nm.

Personally, i tightened all to about 20Nm. Waited two hours, then tightened to 27Nm. The inside of the snout bolt I removed at that time, put the locktite on, tightened to 27Nm.

The loctite info doesn’t seem to show up anywhere but it was told to me over the phone by the Superchargers Online guy to do this. Can’t hurt. There was evidence of loctite on the bolt when I removed it (presumably from the factory).

(Snout torque Order shown below)

(Sidenote/FYI, i believe all bolts on the intake, from the snout to the supercharger to the intercooler were 25 or 27Nm… the throttle body was a tad less, like 20Nm).

I will do a full write up in the next few days. I ran into some common issues and devised some unique solutions that may prove to be helpful to others.

B8487D80-A0D9-408B-B26A-BC77302CEA49.jpeg

F25989C6-1CA8-4DF4-89CF-2DA2CCB6F80E.jpeg
 
Last edited:

Michael Gain

Full Access Member
Joined
Dec 8, 2018
Posts
612
Reaction score
283
Location
Clarksville, TN
Ordered the coupler and red RTV last night.

It's going slowly, but surely.

SO...

Electrical connector on the back(firewall) drivers side of the air intake/supercharger.

How the ^&*^& does this come apart??

And as much as I love you all, if anyone says just squeeze and pull, I will hunt you down and gut you like a fish!!

I can attest that pressing in at the two parallel white lines at the "bottom" of the connector does not work, so if that's how it's supposed to work, where do I pry??

VERY SPECIFIC instructions PLEASE. Pry exactly here... Press exactly here...

THANKS!

I am very close to just cutting the wires and then adding in a splice...

Here is a photo, in a mirror...
View attachment 22188

Well, I got in there and took a peek with the borescope. Tough to get a visual and tougher still to get a picture. All I have is the top side of the sensor (attached but I could see the bottom side and I’m pretty sure it’s got a tab and cleat on the bottom just like on the top. I believe you need to push the tabs in (squeeze the tabs) on both top and bottom, then wiggle it as it has the moisture prevention gaskets in there that will create a suction as you pull. I remember having a tough time with that plug as well, but after i got it off, I couldn’t figure out why it gave me so much trouble.

If it is still being difficult, just remove the bolt and pull the sensor out. It is one of the MAP sensors. On its shaft is a small o-ring. Remove the bolt, twist it back and forth and pull it straight out. The wire lead is pretty long and, with the sensor removed, you will be able to better remove the electrical connector
 

Latest posts

Forum statistics

Threads
36,223
Posts
217,605
Members
30,474
Latest member
sawcut
Top