

NASdiesel
Full Access Member
- Joined
- Dec 21, 2011
- Posts
- 648
- Reaction score
- 60
So I had a few minutes and thought I'd put together a post on my hidden winch install as requested. I'll try to break this down into work segments and materials since I didn't take many pictures throughout the install.
Materials:
- Terra Firma Hidden winch kit (same as RLD I believe) - Lucky 8 provided
- Warn Zeon 10
- Warn Zeon winch relocation kit (solenoid relocation from the top) - 31" relocation wire kit with bracket.--Part Number 92136.029089970
- Viking Offroad Hawse fairlead
- Viking synthetic line
- Hella Battery cutoff switch/key
- Various hardware
- Rugged Ridge Hawse Fairlead License Holder
Optional Extras:
- Rover DRL LED kit
- Hella Compact 4000 Pencil
- Hella Wiring harness
- Logisys RM02 Remote Control Molex Connector Kit (for wireless on/off of lights)
So to begin with, the TF winch tray kit is really meant for the LR3. It replaces the complete steel sectional bumper underneath the plastic skin and comes with brackets for the washer bottle and valve body. I chose the warn zeon as I live in New England, this is my DD vehicle and wanted something that claims corrosion resistance. I pull it off in the spring and see just how good it is.
My winch tray kit came with no hardware and even if it did, I'm pretty sure I would have been sourcing all of my own. Much of this hardware, you will need to track down.
Make sure you prepare a surface to store all of the bits (bag them and label preferred) as all of the bumper hardware differs and is not totally intuitive. I kept the truck on ramps (Tractor Supply sells a great set of plastic ramps). Tires stayed on, you will need to keep the tires turned in full lock to one side or the other if you don't remove the wheels.
The Process:
1)Remove center grille - This just pops out. Several Youtube videos detail the entire process below...
2)Remove headlights - I have the Xenon lamps, pretty easy to pop the unit out and disconnect the wiring harnesses.
3)Remove skid plate - I have a Devon 4x4 complete skid setup and needed to remove this first before gaining access to the rest of the bottom of the bumper. Assume you will need to remove the stock skid if that is what you have.
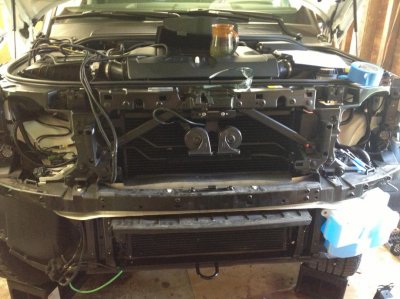
4) Remove front bumper including wheel arch spats. This is detailed elsewhere. Start with the spats, use enough force but not too much to pull them off. Then remove bumper including undercovering. This will reveal the steel crash bumper. I would recommend covering the fascia of the bumper with blue painter's tape. This will be useful later when you need to cut it and want your paintwork intact.
5) Once revealed, disconnect valve body on pass side of bumper backside and washer bottle, tie them up using zipties to the body work so as not to leave hanging. Also disconnect the temp sensor (ambient) and retain.
6)Unbolt steel bumper. The nuts are captive on this one on the backside.
7) Remove plastic shrouding from around lower radiator (where the winch will go). This will require some slight cutting. handheld metal shears worked well for a clean cut on the thick plastic.
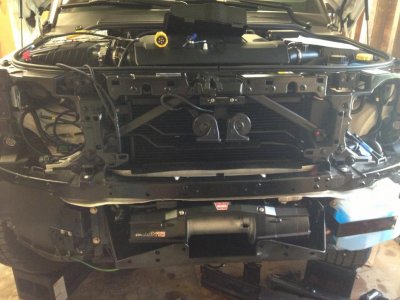
8)Once done, you basically have a clean slate... Time to start the install..
Time for removal and cataloging - I would say you want at least 6 hours to include all of the above. You can definitely do it faster. But I wouldn't rush it.
Install:
1) Drill out the captive nuts holding the original steel bumper. I personally wasn't okay with reusing the captive nuts. I don't view them as strong enough for being pulled on, but rather designed to be pushed on. I used 1/2" Grade 8 hardware for installing the winch tray.
2) Notch the winch tray for the AC dryer assembly on the passenger side. You will need a grinder to grind out a small notch and cut the upper retainer on the winch tray itself off, as it will foul with the AC dryer.
3) Manipulate the lower radiator support with a 5lb hammer and cloth. No easy way to do this. When you test fit the winch tray, depending on the winch, you will notice that the freespool release fouls on the radiator support. I bluntly used the hammer with cloth to "adjust" the sheet metal upwards to allow for clearance of the freespool. Requires you to test fit the winch and tray multiple times, so get a helper or make sure you ate your Wheaties. I did not want to cut this bit for many reasons, and there is no need to.
4) Bolt on winch tray. As you are fitting the winch try, you will need to add the Ambient Temp sensor. I chose not to elongate the wiring and bolted this to the inside of the winch try. For bolting the winch tray itself, you will find one bolt on the upper driver side is especially challenging, I bent a cheap socket wrench to reach behind the bolt where my hands couldn't fit, the fit the washer and nut and tighten.
5) Add on the brackets for the valve body and washer bottle on either side. I used stainless hardware on these. A
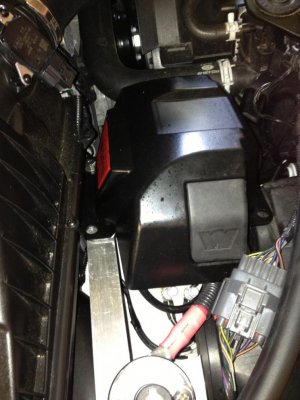
6) Now that the winch is on, you will want to focus on the winch solenoid and wiring. For this, I chose the space behind the passenger side headlight. Just enough for reusing the solenoid and housing and inline to the battery. This required buying some aluminum (easy to bend) flat stock and stainless hardware, and bending two section to bolt to the wheel arch side and lower headlight body section. You can see some of this in the pictures. In addition, I added the Hella cutoff switch in line. Disconnecting the Warn Zeon solenoid pack from the winch takes about an hour in total and the 31" wires are just long enough to reach the solenoid from the winch position if the solenoid is facing the interior of the car. You will need an extra length (24") of wire for the connection from the Hella cutoff switch to the battery. All of this takes time and you will not want to rush it. Hacksaw, grinder and dremel is indispensable.
7) Bolt it all together, TEST the solenoid function. Test the winch. Check all connections. If you fail to do this now, you will have a melt down later.
8) Test fit the fascia of the bumper. You will find it needs to be relieved using a Dremel and grinder disc where the winch tray protrudes. All of the plastic needs to be cut just on the inside of the bumper. This will take a while. You will also need to cut some trim where the freespool is accessed by hand (enough room to fit your hand in and flip the freespool back and forth). Next, once the bumper fits, you need to begin aligning it for the big external cut for the fairlead.
9) Fairlead - I chose a hawse fairlead to make the install as minimal as possible. I also did so based on my hunch that the PDC would not foul on it. I was right. Anyway, the issue with this kit not being designed for the LR4 is the space between where the tray ends, the bumper and the fairlead begins. You will need to measure and buy some spacers to standoff the fairlead so as not to pinch the bumper against the tray, if that makes sense. It is about 1.5 inches and you can buy that from McMaster Carr (or similar) or make your own.
10) To fit the fairlead, I drew the fairlead on the bumper (blue tape) based on the rough alignment, then drilled two pilot holes to locate the bolt holes for the fairlead, starting small and enlarging in the direction of the bolt alignment. Once you do this, re-trace the fairlead and begin your through bumper cutting. If you screw this up, new bumpers are for sale on the time on ebay.
11) After cutting, sanding to clean them up, mount bumper starting with fairlead. Bolt together. DON'T FORGET to install the winch line before bolting the bumper on! This will save some time consumption after the bumper is on.
12)Reverse the uninstall process detailed above.
Side Notes:
During this install, I chose to include adding the Rover DRL kit ($850) and Hella lights protruding from the grille. This can be detailed later. BUT, if you are going to do the DRL kit, now when the bumper is off, is the only time to do it. The install for the DRL's without the bumper removal takes 2-3 hours alone (includes bumper cutting, wiring, etc).
This sums up what I can think of for now. This is not for the faint of heart but if you are confident, have a reasonable set of tools and can spare some down time for the truck (total around 1-2 days), then this is easily doable for anyone use to making bolt on modifications.
Materials:
- Terra Firma Hidden winch kit (same as RLD I believe) - Lucky 8 provided
- Warn Zeon 10
- Warn Zeon winch relocation kit (solenoid relocation from the top) - 31" relocation wire kit with bracket.--Part Number 92136.029089970
- Viking Offroad Hawse fairlead
- Viking synthetic line
- Hella Battery cutoff switch/key
- Various hardware
- Rugged Ridge Hawse Fairlead License Holder
Optional Extras:
- Rover DRL LED kit
- Hella Compact 4000 Pencil
- Hella Wiring harness
- Logisys RM02 Remote Control Molex Connector Kit (for wireless on/off of lights)
So to begin with, the TF winch tray kit is really meant for the LR3. It replaces the complete steel sectional bumper underneath the plastic skin and comes with brackets for the washer bottle and valve body. I chose the warn zeon as I live in New England, this is my DD vehicle and wanted something that claims corrosion resistance. I pull it off in the spring and see just how good it is.
My winch tray kit came with no hardware and even if it did, I'm pretty sure I would have been sourcing all of my own. Much of this hardware, you will need to track down.
Make sure you prepare a surface to store all of the bits (bag them and label preferred) as all of the bumper hardware differs and is not totally intuitive. I kept the truck on ramps (Tractor Supply sells a great set of plastic ramps). Tires stayed on, you will need to keep the tires turned in full lock to one side or the other if you don't remove the wheels.
The Process:
1)Remove center grille - This just pops out. Several Youtube videos detail the entire process below...
2)Remove headlights - I have the Xenon lamps, pretty easy to pop the unit out and disconnect the wiring harnesses.
3)Remove skid plate - I have a Devon 4x4 complete skid setup and needed to remove this first before gaining access to the rest of the bottom of the bumper. Assume you will need to remove the stock skid if that is what you have.
4) Remove front bumper including wheel arch spats. This is detailed elsewhere. Start with the spats, use enough force but not too much to pull them off. Then remove bumper including undercovering. This will reveal the steel crash bumper. I would recommend covering the fascia of the bumper with blue painter's tape. This will be useful later when you need to cut it and want your paintwork intact.
5) Once revealed, disconnect valve body on pass side of bumper backside and washer bottle, tie them up using zipties to the body work so as not to leave hanging. Also disconnect the temp sensor (ambient) and retain.
6)Unbolt steel bumper. The nuts are captive on this one on the backside.
7) Remove plastic shrouding from around lower radiator (where the winch will go). This will require some slight cutting. handheld metal shears worked well for a clean cut on the thick plastic.
8)Once done, you basically have a clean slate... Time to start the install..
Time for removal and cataloging - I would say you want at least 6 hours to include all of the above. You can definitely do it faster. But I wouldn't rush it.
Install:
1) Drill out the captive nuts holding the original steel bumper. I personally wasn't okay with reusing the captive nuts. I don't view them as strong enough for being pulled on, but rather designed to be pushed on. I used 1/2" Grade 8 hardware for installing the winch tray.
2) Notch the winch tray for the AC dryer assembly on the passenger side. You will need a grinder to grind out a small notch and cut the upper retainer on the winch tray itself off, as it will foul with the AC dryer.
3) Manipulate the lower radiator support with a 5lb hammer and cloth. No easy way to do this. When you test fit the winch tray, depending on the winch, you will notice that the freespool release fouls on the radiator support. I bluntly used the hammer with cloth to "adjust" the sheet metal upwards to allow for clearance of the freespool. Requires you to test fit the winch and tray multiple times, so get a helper or make sure you ate your Wheaties. I did not want to cut this bit for many reasons, and there is no need to.
4) Bolt on winch tray. As you are fitting the winch try, you will need to add the Ambient Temp sensor. I chose not to elongate the wiring and bolted this to the inside of the winch try. For bolting the winch tray itself, you will find one bolt on the upper driver side is especially challenging, I bent a cheap socket wrench to reach behind the bolt where my hands couldn't fit, the fit the washer and nut and tighten.
5) Add on the brackets for the valve body and washer bottle on either side. I used stainless hardware on these. A
6) Now that the winch is on, you will want to focus on the winch solenoid and wiring. For this, I chose the space behind the passenger side headlight. Just enough for reusing the solenoid and housing and inline to the battery. This required buying some aluminum (easy to bend) flat stock and stainless hardware, and bending two section to bolt to the wheel arch side and lower headlight body section. You can see some of this in the pictures. In addition, I added the Hella cutoff switch in line. Disconnecting the Warn Zeon solenoid pack from the winch takes about an hour in total and the 31" wires are just long enough to reach the solenoid from the winch position if the solenoid is facing the interior of the car. You will need an extra length (24") of wire for the connection from the Hella cutoff switch to the battery. All of this takes time and you will not want to rush it. Hacksaw, grinder and dremel is indispensable.
7) Bolt it all together, TEST the solenoid function. Test the winch. Check all connections. If you fail to do this now, you will have a melt down later.
8) Test fit the fascia of the bumper. You will find it needs to be relieved using a Dremel and grinder disc where the winch tray protrudes. All of the plastic needs to be cut just on the inside of the bumper. This will take a while. You will also need to cut some trim where the freespool is accessed by hand (enough room to fit your hand in and flip the freespool back and forth). Next, once the bumper fits, you need to begin aligning it for the big external cut for the fairlead.
9) Fairlead - I chose a hawse fairlead to make the install as minimal as possible. I also did so based on my hunch that the PDC would not foul on it. I was right. Anyway, the issue with this kit not being designed for the LR4 is the space between where the tray ends, the bumper and the fairlead begins. You will need to measure and buy some spacers to standoff the fairlead so as not to pinch the bumper against the tray, if that makes sense. It is about 1.5 inches and you can buy that from McMaster Carr (or similar) or make your own.
10) To fit the fairlead, I drew the fairlead on the bumper (blue tape) based on the rough alignment, then drilled two pilot holes to locate the bolt holes for the fairlead, starting small and enlarging in the direction of the bolt alignment. Once you do this, re-trace the fairlead and begin your through bumper cutting. If you screw this up, new bumpers are for sale on the time on ebay.
11) After cutting, sanding to clean them up, mount bumper starting with fairlead. Bolt together. DON'T FORGET to install the winch line before bolting the bumper on! This will save some time consumption after the bumper is on.
12)Reverse the uninstall process detailed above.
Side Notes:
During this install, I chose to include adding the Rover DRL kit ($850) and Hella lights protruding from the grille. This can be detailed later. BUT, if you are going to do the DRL kit, now when the bumper is off, is the only time to do it. The install for the DRL's without the bumper removal takes 2-3 hours alone (includes bumper cutting, wiring, etc).
This sums up what I can think of for now. This is not for the faint of heart but if you are confident, have a reasonable set of tools and can spare some down time for the truck (total around 1-2 days), then this is easily doable for anyone use to making bolt on modifications.

 .
.