PCV refresh/replacement

Disclaimer: Links on this page pointing to Amazon, eBay and other sites may include affiliate code. If you click them and make a purchase, we may earn a small commission.

Michael Gain

Full Access Member
Joined
Dec 8, 2018
Posts
612
Reaction score
283
Location
Clarksville, TN
Good news: water pump is fine. Tapping noise is my paranoia amplifying the sound. Mechanic could barely hear it, but checked the tensioners, water pump, fan clutch, etc and all are in perfect condition.

The valve cover is leaking vacuum. He quoted 10 hrs of labor plus parts. My intent is to drop off the following parts, and pay for the $1000ish in labor--my wife has demanded that I spend one weekend not working on the truck.

Parts:
LR051835--valve cover ($184)
LR037089-- fuel injector kit ($18 x 3)
LR041680--supercharger to intake manifold gasket ($45)
LR041681--intake manifold gasket ($18 x 2)

So, about $1300 all in. Or I can pay the $320 in parts and $300 in Atlantic British special tools for the injector removal and reinstall, and then do it myself under a disapproving gaze...
 

NavDefender

New Member
Joined
Oct 16, 2020
Posts
4
Reaction score
0
Location
Virginia Beach, USA
Thanks for a great write up.

Posting for any future troubleshooters: I had codes P2189 and P2187 on my 2016 SCV6 LR4, and was able to clear the codes after swapping out the valve diaphragm, which I found had a small tear in it.

Maybe I was doing it wrong, but I had a really tough time getting the cover off and an even tougher time getting the diaphragm in and new cover back on. There are very few interferences, as shown in the post above, but the interior side of the cover basically rests on the side of the engine, making it a very tight squeeze. My biggest concern was pinching the new diaphragm when trying to snap the new cover back down, and I wasn’t confident I didn’t do it until the codes didn’t come back!

Went for the OEM part from my local dealer for $77.

IMG_7687.jpg


Sent from my iPhone using Tapatalk
 

jlglr4

Full Access Member
Joined
Mar 19, 2019
Posts
938
Reaction score
484
Location
Northern California
Just did the PCV refresh and thought I’d share my experience (as the first try didn’t work). Thanks to Michael Gain for the great write-up. Very helpful.

First of all, my PCV looked okay at 52K miles. It wasn’t torn, but it was making some noise when I shut the engine down (low whine/moan - thought it was a pulley) and I was trying to track down a vacuum leak, so thought I’d start with the PCV.

On my first try, I was using one of the cheap PCV valves off ebay. I followed Michael’s procedure, except that I could not get the cap on by holding the PCV valve in place with one hand while maneuvering the cap into place with the other. So, I used this trick I picked up from a video where a zip-tie is threaded through the cap and over the spring to keep the whole thing compressed while getting it into position, then the zip tie is cut and pulled out just before pushing the cap into place. This worked great, except that the PCV was whistling and moaning like a beast when I was done. I’m not sure if the problem was the cheap PCV diaphragm or the zip-tie method possibly pulling the diaphragm out of place.

For my second try, I picked up an oem diaphragm from local dealer (LR133579 - PCV service kit - cap and diaphragm, but no spring). Dealer wanted $71, but came down to $41 after I pointed to another dealers website with the reduced price). This time, instead of the zip-tie, I tied the spring on two sides with a piece of string using a knot that would release when I pulled the string out. By tying only the spring, I could focus on getting the diaphragm to seat properly in the groove.

Second try seems to have worked - no whistling/moaning - but, again, not sure if it was the method or the material that helped. The OEM diaphragm did seem every so slightly stiffer than the knock-off.

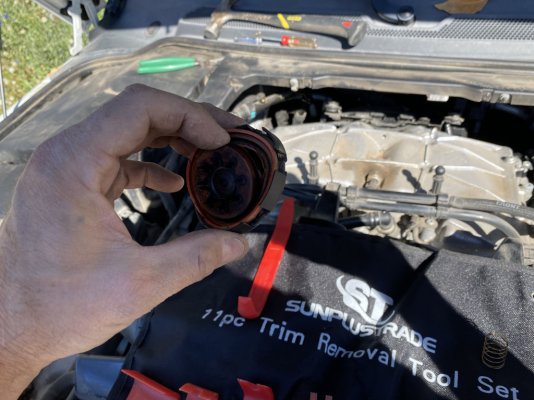
Pics attached showing Michael’s method of tucking the insulation behind the valve, zip-tie and string methods of compressing the spring, and a top view of the inside of the PCV for anyone interested.

6EA9D315-7C3D-4CA5-86D3-AF5997D95680.jpeg


A3BF6E22-E17D-414D-A8B6-8111ABCCDD6B.jpeg


8358E60C-71A1-4B4C-8910-9D30CA970B75.jpeg


CAD6A6B9-2CCA-4512-AA60-CB35D9875818.jpeg
 

DaytonaRS7

Full Access Member
Joined
Apr 7, 2020
Posts
589
Reaction score
304
Location
11743
this is really an issue? maybe i got really lucky.

i had no problem at all just loosely placing the valve in place and a light tap with a rubber mallet clipped in the housing. i think i spent all of 10 minutes replacing them, 8 minutes of which would have been trying to remove the old ones gently, until i realized the housings were too brittle to not crack. pried them off carelessly with a screwdriver and snapped new ones in place.

EDIT: i now realize this DIY was regarding the V6.
 
Last edited:

jlglr4

Full Access Member
Joined
Mar 19, 2019
Posts
938
Reaction score
484
Location
Northern California
Are you talking about the V8? On the supercharged car, I don’t see getting a mallet in there.

The repair itself was quick - took me maybe 20 minutes being pretty careful. But I found wedging the new cap and PCV into place with the lip under the supercharger to be pretty tricky. I had no confidence the lip of the diaphragm was going to seat in the groove rather than just get crushed under the lip of the cap (and leak). Maybe I just have big clumsy hands.
 

DaytonaRS7

Full Access Member
Joined
Apr 7, 2020
Posts
589
Reaction score
304
Location
11743
Are you talking about the V8? On the supercharged car, I don’t see getting a mallet in there.

The repair itself was quick - took me maybe 20 minutes being pretty careful. But I found wedging the new cap and PCV into place with the lip under the supercharger to be pretty tricky. I had no confidence the lip of the diaphragm was going to seat in the groove rather than just get crushed under the lip of the cap (and leak). Maybe I just have big clumsy hands.

ahh, yes. didn't go back through the thread to realize this was about the v6 SC. sucks they make what should be such a simple repair, into something complicated.
 

duncanator

New Member
Joined
Nov 12, 2020
Posts
3
Reaction score
0
Location
Sacramento
Are you talking about the V8? On the supercharged car, I don’t see getting a mallet in there.

The repair itself was quick - took me maybe 20 minutes being pretty careful. But I found wedging the new cap and PCV into place with the lip under the supercharger to be pretty tricky. I had no confidence the lip of the diaphragm was going to seat in the groove rather than just get crushed under the lip of the cap (and leak). Maybe I just have big clumsy hands.

How did you get it seated properly? I don't want to force it in a way that might damage it and would be curious how you made sure it was attached. Thanks!
 

duncanator

New Member
Joined
Nov 12, 2020
Posts
3
Reaction score
0
Location
Sacramento
Well, what I did was use a plastic trim tool and put it over the cap and then use a large, flat screwdriver to push it down to seat it. I used the plastic trim tool to spread out the pressure and protect the plastic cap from the metal screwdriver. Fingers crossed that it worked!
 

jlglr4

Full Access Member
Joined
Mar 19, 2019
Posts
938
Reaction score
484
Location
Northern California
Glad you got it sorted. Once you get the diaphragm in that groove around the rim of the opening, i don’t think the method of squeezing the cap on is critical. you’re probably good. listen for noise, or use smoke/tissue to look for vacuum. or check fuel trims with gap tool.
 

zgpablo

Member
Joined
Apr 25, 2018
Posts
21
Reaction score
7
Location
Aspen Colorado USA
Hi all! I am so glad I did a quick search of this forum before going to find a local mechanic. This was my exact issue, 2014 V6 LR4. Roaring to life on 90% of starts, straight up to 3,000 RPM's. Quite embarrassing, I got a lot of "DUDE! What the hell is wrong with your car?" comments.

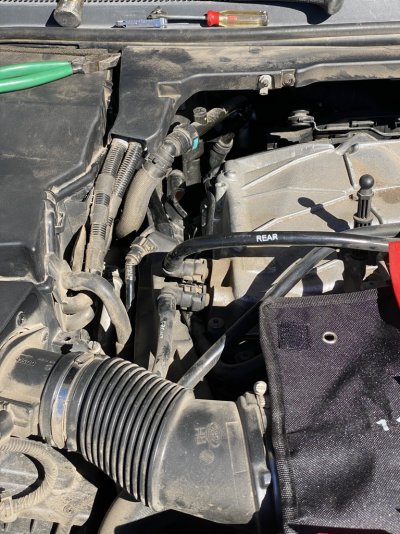
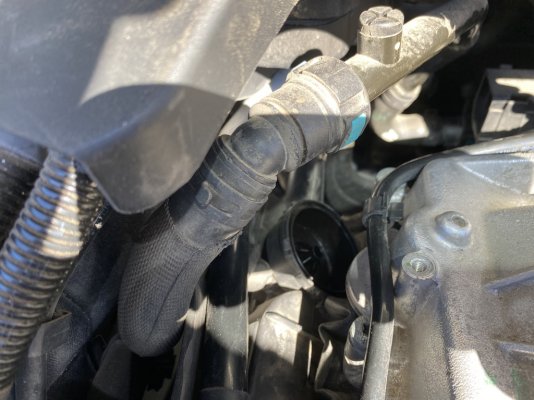
It took me a minute to locate it, even with the pictures and descriptions, and then getting the pipes out of the way and trying to take it off somewhat gently...

Putting it back on was easier than I expected, I just used my fingers to hold the spring. Then before snapping it in place I rotated it a few times with my headlamp shining in the gap to see that the spring was correctly lined up all around, top and bottom. Then I just aligned the tabs and pushed it into place.

Thanks,690677C9-0AF9-4C91-A9F6-CB8FF4DE4616_1_105_c.jpegE95DCAAE-01CA-4224-865C-2F904F690EEF_1_105_c.jpegE24E8D71-19C8-4776-B682-3D26366EE689_1_105_c.jpeg @Michael Gain for the OP.
 

Members online

Forum statistics

Threads
36,255
Posts
217,952
Members
30,493
Latest member
A562NV
Top