2016 LR4 Coolant Crossover, Water Pump, Thermostat Replacement

Disclaimer: Links on this page pointing to Amazon, eBay and other sites may include affiliate code. If you click them and make a purchase, we may earn a small commission.

timc930

Full Access Member
Joined
Nov 13, 2018
Posts
247
Reaction score
103
Location
Mt P SC
FF42527E-0950-472C-9F70-8CB66D768DDE.jpeg
Finished it up today. Replaced every coolant/heater hose in the engine bay, Water Pump, Trans cooler hoses, Thermostat, and of course the coolant pipes. Did a vacuum fill, but still had some air, so I pressurized the system to 10psi then opened each valve to let air out, then quickly followed the manual procedure, and runs good now.

I have this one 6mm hex bolt that I cannot remember where it went! See pic above.
 
Last edited:

ufcfc

Member
Joined
Nov 21, 2019
Posts
12
Reaction score
2
Location
Florida
Great thread, thanks to everyone for all the info!

Wondering if someone might have some insights for me. Some background... I realized my water pump was probably leaking over the weekend when I suddenly got really bad belt squeal (and shortly after a low coolant level warning was another good hint).

Luckily I already had a new pump I was waiting to get around to putting in (was last done at ~55k - and my '14 SCV6 is at 112k now).

After I finished replacing the pump (also did rear oil cooler tube & o-rings on both ends of that), I still seem to have a leak (or maybe I just can't bleed it correctly).

I added coolant via the front crossover pipe, then topped off expansion tank. Next I attempted a manual bleed (opened both rear bleeder and tank bleeder - had heat running). I actually did this a few times (probably a good 15-25 minutes each time), b/c each time I would start to get coolant coming out - but no heat from vents w/ A/C set to Hi. I also left cap off overnight and tried again - no luck.

One time after it had heated up quite a bit, I started to hear a hissing coming from what sounded like the new water pump. I quickly got off the intake manifold just in time to see part #7 on attached pic (little plastic nozzle going into the tiny output on the water pump was spurting out coolant/air mixture - and it actually was very easy to pull out entirely - not like when I removed it from the old one and i had to hold down the water pump piece while pulling out - it just slides right in/out almost freely)...

Btw, I was also waiting to swap the front/rear crossover pipes (decided to do water pump alone b/c I thought it would be quick/easy fix to get me back on the road). But I am planning on taking it into an indy in a couple weeks (his availability) to have the pipes + two front belts done.


So I have two real questions - (1) Any ideas, other than replacing part #7, on why I'm still seeing a coolant leak and can't seem to get the new new water pump bled correctly? and (2) Wondering if I should replace the primary/secondary tensioners and pulleys for the two front belts (which I am replacing) while I have the indy in there (if so, does anyone know the size and # of idler pulleys - I'm only seeing a 90mm, but it seems like there are more & diff sizes)?

Thanks for any input
 

Attachments

  • pumpnoz.PNG
    pumpnoz.PNG
    316.5 KB · Views: 66

jlglr4

Full Access Member
Joined
Mar 19, 2019
Posts
941
Reaction score
486
Location
Northern California
As for the leak, sounds like you’re leaking at the little elbow (Part #7) - if you’re saying you have another leak behind the pump, then its likely the tube that connects the back of the pump to the oil cooler, or the front crossover where it goes into the block.

As long as you have a leak, I don’t think you’re going to be able to bleed the system properly. It’ll pump air out the leak as it heats up, and suck air back in as it cools down. In any event, there are four bleed points, and you’ll need to get the reservoir raised up about an inch. I posted the manual bleeding procedure here: https://www.landroverworld.org/threads/bleeding-coolant-woes-help-needed.43299/#post-230151.

With regard to the tensioners/pulleys, if they look/sound bad, replace them. Otherwise, I‘d just leave them be and check on them once in a while. They are not too hard to get to as I recall. There is a TSB on one of the idler pulleys, so you do want to catch it before it gets too bad or it can shred the belt.
 

ufcfc

Member
Joined
Nov 21, 2019
Posts
12
Reaction score
2
Location
Florida
As for the leak, sounds like you’re leaking at the little elbow (Part #7) - if you’re saying you have another leak behind the pump, then its likely the tube that connects the back of the pump to the oil cooler, or the front crossover where it goes into the block.

As long as you have a leak, I don’t think you’re going to be able to bleed the system properly. It’ll pump air out the leak as it heats up, and suck air back in as it cools down. In any event, there are four bleed points, and you’ll need to get the reservoir raised up about an inch. I posted the manual bleeding procedure here: https://www.landroverworld.org/threads/bleeding-coolant-woes-help-needed.43299/#post-230151.

With regard to the tensioners/pulleys, if they look/sound bad, replace them. Otherwise, I‘d just leave them be and check on them once in a while. They are not too hard to get to as I recall. There is a TSB on one of the idler pulleys, so you do want to catch it before it gets too bad or it can shred the belt.
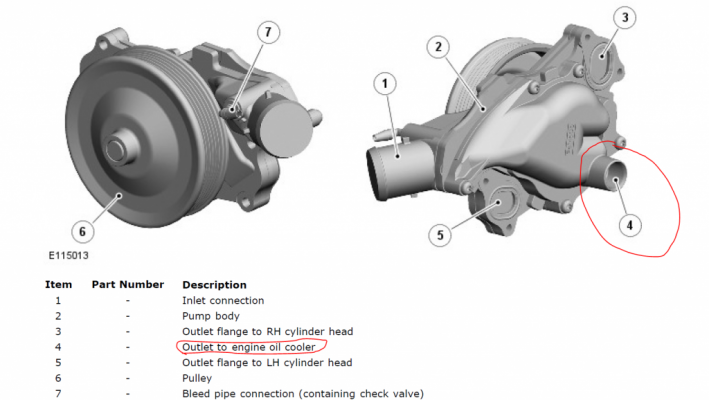
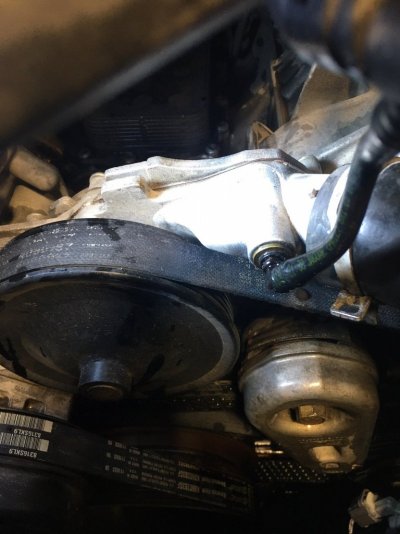
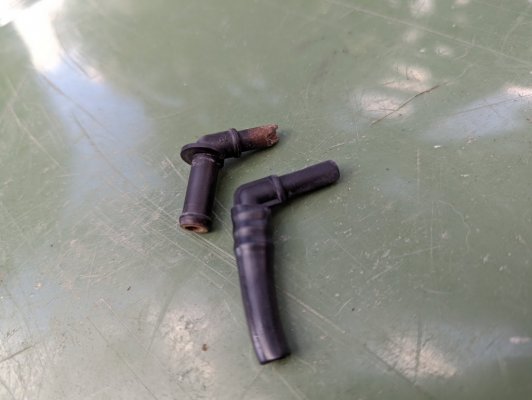
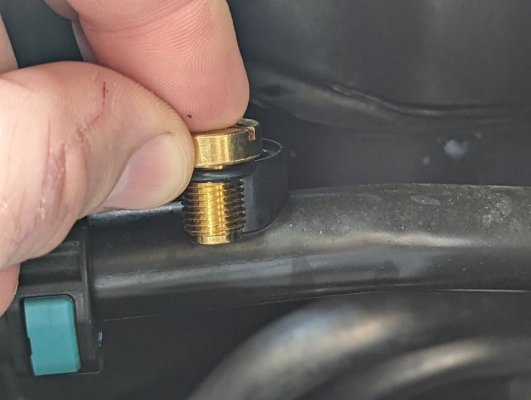
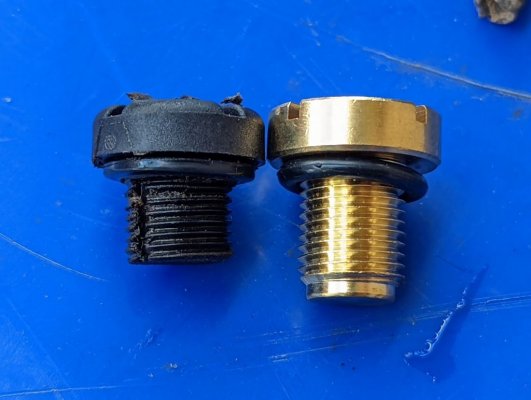
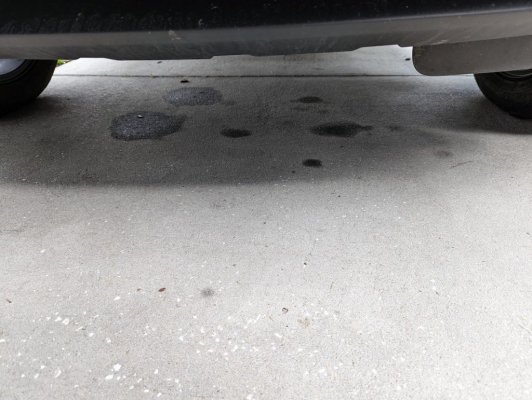
Thanks so much for the info & link. I hadn't seen your exact procedure for the bleed (followed a similar one w/o raising the tank). I will replace that #7 nozzle (and hope the new one makes a good seal in the water pump) and try again.

I'm thinking the continued leak is probably either that #7 or a cracked crossover. Having had it sit for a couple days now, there are no drips/leaks, and the tank is holding steady at the max fill line.

But just in case, any idea if the oil cooler tube can actually go on incorrectly? It seemed pretty straight forward - and once the new pump was tightened down I don't really see how it could not be on right, but I'm a novice.

Thanks again
 

jlglr4

Full Access Member
Joined
Mar 19, 2019
Posts
941
Reaction score
486
Location
Northern California
The oil cooler tube should have the seals replaced on both ends, so if you only replaced one, that’s a potential problem. They can also get into a crooked position when the pump is pushed on, and one forum member reported that one of the seals got twisted somehow, so it wasn’t sealing properly.
 

ufcfc

Member
Joined
Nov 21, 2019
Posts
12
Reaction score
2
Location
Florida
The oil cooler tube should have the seals replaced on both ends, so if you only replaced one, that’s a potential problem. They can also get into a crooked position when the pump is pushed on, and one forum member reported that one of the seals got twisted somehow, so it wasn’t sealing properly.
Good to know. I definitely replaced both o-rings (one pump side & one engine side). So hopefully it's just the check-valve making more of a mess than I expected.

Thanks again for the help
 

ktm525

Full Access Member
Joined
Mar 26, 2017
Posts
2,622
Reaction score
1,283
Location
alberta
Just went through a front crossover and pump replacement.. The oil cooler pump o ring goes on pipe and then pump slid on. Otherwise the seal deforms if you place it on pump first and try to slide on. I had to modify the old check valve assembly as mine was broken. I used a new plastic elbow from the new style kit and modified my own assembly. So far so good. I did break the rear air bleed screw. Plastic just crumbled so I JB welded the whole thing.

You may simply have air bubbles. I refilled my expansion tank and started the vehicle. While idling leaving expansion tank cap off I would open the tank bleed and watch air bubbles coming through. Stop cocked that a bunch of times and the expansion tank level got low. I kept refilling (2x). Some more air tank bleeds and it seemed ok. Heat was marginal on test drive so more air bubbles. Some revs seemed to move the bubbles along. Tank low again so fill to line and I think I got the air out of system. Tons of heat which is nice because it is currently -20C. Lots of nooks and crannies for air to hide in this overly complex cooling system. New OE pump and crossover so hopefully that is that last time on this 2010..
 

ufcfc

Member
Joined
Nov 21, 2019
Posts
12
Reaction score
2
Location
Florida
More good info, thank you. I am wondering if the oil cooler pipe might be an issue for me. While I initially tried to do the job the right way (taking off the radiator fan), I wasn't able to, even w/ a 57mm/36mm clutch wrench set. It was so tight, every time I tried to get the fan loose the bigger wrench on the little nuts pulley side started gnarling the edges of those nuts - so I quit trying before it got too bad.

I ended up doing it w/ the radiator fan on (and both belts off, slung to the sides). Only catch was I couldn't seem to get the pump back in position w/ the oil cooler pipe in-place engine side. So I put the O-Ring on the metal tube engine side, then placed the plastic cooler pipe on the back of the pump (new O-Ring also there), and was able to (seemingly quite easily) get it seated in place before finally tightening down the 4xT30's.

Tracking is showing that I'll get the #7 piece (and the rest of the attached hose assembly it's part of) on Sunday. So hopefully I'll be able to figure out pretty quickly if I'm still having issues. I planned to just pull that #7 elbow and swap it into place on my old hose (which already has a spring clamp hose side anyway). Is that what you did? If so, any tips, or was it pretty straight forward?
 

ktm525

Full Access Member
Joined
Mar 26, 2017
Posts
2,622
Reaction score
1,283
Location
alberta
On the new assembly I removed the rubber hose that had the plastic elbow on one end. I had to cut one of the preformed tubes from the original assembly (the portion that had the broken plastic elbow.). I then put the rubber hose over the remaining portion and clamped it. It should be apparent when you lay it out. I had more access because I had tilted my intake manifold back as I was also replacing the front cross over. I think this created extra space to place the pump. I left the small belt in place and simply took the big belt partially off and then removed the tensioner. Lots of room.
 

Attachments

  • lr4 tb.jpg
    lr4 tb.jpg
    141.5 KB · Views: 56
  • water pump.jpg
    water pump.jpg
    119.8 KB · Views: 60

ufcfc

Member
Joined
Nov 21, 2019
Posts
12
Reaction score
2
Location
Florida
So I got the new piece (old and new pictured side by side below). I bought this: https://www.amazon.com/gp/product/B0813JSW2Z/ref=ppx_yo_dt_b_asin_title_o08_s00?ie=UTF8&psc=1 - and as mentioned, I just cut the part I needed off the new piece, then slid and clamped it onto the old piece (slides right into the tube the old one came out of). I also purchased a brass bleeder cap for the rear (link mentioned earlier in the thread seemed to be broken, so I used: https://www.amazon.com/gp/product/B07S7H7P1F/ref=ppx_yo_dt_b_asin_title_o02_s00?ie=UTF8&psc=1) - it's a little longer (pictured), but tightens down fine, and seems to work well.

With the new check valve piece securely in place I was no longer leaking from there, and the manual bleeding process went fine. The AC was spitting high heat in just a few minutes.

Unfortunately, I still have a bad leak somewhere (at this point I almost wonder if my old water pump wasn't even bad). If I top off the reservoir w/ ~1 liter mixed coolant, after about 10 miles city driving/20 minutes I get the low coolant warning. It's definitely getting onto the pulleys a bit, b/c I'll get some random squeals (but doesn't seem to be leaking directly on them b/c it's a very intermittent squeal). Anecdotally, once the coolant level gets near the bottom of the reservoir (well, well below the min line), it seems to stop leaking (at least very much). But I've only driven it twice (thinking it was fixed), and once it indicates low coolant I've cut bait - so no telling if it would continue to leak down to nothing or not; obviously, not risking it.

Last picture was the pattern of coolant on the ground (I also realized after getting home, there was a similar pattern it made in another spot it sat overnight - after coolant was topped off following the bleed).

At this point I'm taking it into my indy first thing next week. But if there's anything anyone knows that could help him shortcut the diagnosis I'd appreciate it.

Thanks!
 

Attachments

  • PXL_20220102_193745114.jpg
    PXL_20220102_193745114.jpg
    86.6 KB · Views: 43
  • PXL_20211228_170744284.jpg
    PXL_20211228_170744284.jpg
    75.4 KB · Views: 53
  • PXL_20211228_170721135.jpg
    PXL_20211228_170721135.jpg
    91.3 KB · Views: 40
  • PXL_20220104_191342613.jpg
    PXL_20220104_191342613.jpg
    177.4 KB · Views: 41

Latest posts

Members online

Forum statistics

Threads
36,260
Posts
218,017
Members
30,496
Latest member
washburn72
Top