You are using an out of date browser. It may not display this or other websites correctly.
You should upgrade or use an alternative browser.
You should upgrade or use an alternative browser.
Diy timing chain
- Thread starter djkaosone
- Start date
Disclaimer: Links on this page pointing to Amazon, eBay and other sites may include affiliate code. If you click them and make a purchase, we may earn a small commission.
Tirebiter
New Member
If you have a 2013, you'd be replacing yours with the exact same part. If the oil changes on yours have been at a reasonable 7k mile interval or less, I'd guess yours are fine.
Mine is a 2012...
Huy Tran
Full Access Member
HELP!
I am now elbow deep in my timing chain replacement and need some help. Got everything torn apart. Replaced all the guides and tensioners. Lined up all timing marks. Pre tensioner and tightened everything down. Went to turn the crank to test. Half way through the first turn, the chain jumped! Tried to turn a little more and the chain jumped some more, on both sides. Removed the tensioner and main guide to re-align the chain.
Here's where I'm stuck. When I tried to push the tensioner piston down to its original position, it locked itself half way and I can't get to budge now.
Are the tensioners one-time use?
Once you've pulled the locking pin, there's no reset?
Huy Tran
Full Access Member
@djkaosone
Thanks so much for you trick to remove the fuel rail. Genius!
My approach with a bottle jack isn't as classy but got the job done!
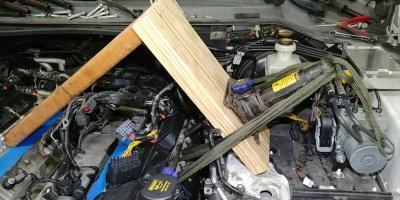
Thanks so much for you trick to remove the fuel rail. Genius!
My approach with a bottle jack isn't as classy but got the job done!

@djkaosone
Thanks so much for you trick to remove the fuel rail. Genius!
My approach with a bottle jack isn't as classy but got the job done!
View attachment 10222
This is awesome
ALL tensioners are 1-time use. Once you pull the pin, that's it. I've gone through 4 because of my mistakes. Hoping that others learned from my mistakes.Are the tensioners one-time use?
Once you've pulled the locking pin, there's no reset?
The trick is to get as much tension on the chain with the tension guides before bolting the tensioner. Before you pull the pin, check the gap between the guide and tensioner with a flat head by pushing the guide against the chain. The gap should be very minimal. Once you're 100% sure all the marks are lined up, pull the pin.
Huy Tran
Full Access Member
Thank @djkaosone.
That's what I figured. Wanted to make sure before I dropped another $300.
Why are they designed like this?
Some workshop diagrams even shows the instructions to install the piston, pushing it in, and inserting the pin.
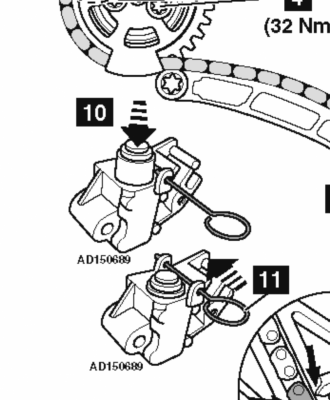
Also, can you elaborate on TDC and BTDC? Are you saying to turn the crank counter clockwise 5-10 degrees to get true timing?
That's what I figured. Wanted to make sure before I dropped another $300.
Why are they designed like this?
Some workshop diagrams even shows the instructions to install the piston, pushing it in, and inserting the pin.

Also, can you elaborate on TDC and BTDC? Are you saying to turn the crank counter clockwise 5-10 degrees to get true timing?
Yeah, it's very misleading. I saw that too and knew not to do it.Why are they designed like this?
Some workshop diagrams even shows the instructions to install the piston, pushing it in, and inserting the pin.
Timing alignment is all based off of BTDC (Before Top Dead Center) on the 5.0L engine. TDC is simply Top Dead Center, where cylinder 1 camshaft lobe is at the peak point of lift. Most of the cars I worked on have timing aligned to TDC.Also, can you elaborate on TDC and BTDC? Are you saying to turn the crank counter clockwise 5-10 degrees to get true timing?
When I worked on the LR4 I thought I locked the cam locking plate, but I didn't. Here's the workshop manual of the cam locks from the back of the camshafts.
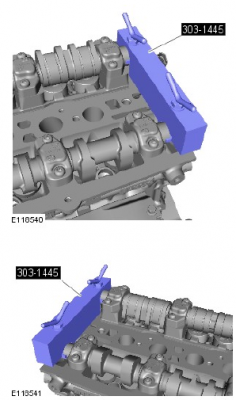
Here's what it looks like in the back.
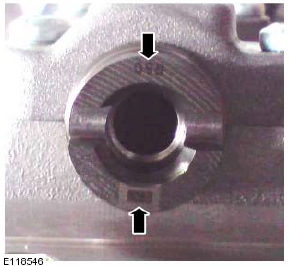
Both intake and exhaust has to be lined up straight to secure the cam lock. My issue was that I thought it was completely lined up with cam lock sliding into position, but it actually only slid in on one notch of each cam shaft instead of both notches. There's really no room back there to even see. This was where I had a scrap aluminum flat bar laying around and stuck it on the back of 1 cam shaft and rotated the crank shaft counterclockwise to feel that it was lining up with the other cam shaft. That's when I knew it was BTDC. Low and behold that was the issue. Once the both intake and exhaust cam shafts were lined up on each bank, I locked it with the cam shaft lock tool. This also meant that the crankshaft key was off by 5-10 degrees BTC. I then had to loosen the chains once again, move the crank shaft into the 6 o'clock position, lock everything into place, and set timing again. That's what ultimately fixed my issue. I would suggest you do this too before you get the new tensioners installed again.
Again, I appreciated everyone's input.
Last edited:
Huy Tran
Full Access Member
Thanks for the info!
I don't think that projects like this would be possible without the detailed write-up and contributions like yours.
Much appreciated!
I don't think that projects like this would be possible without the detailed write-up and contributions like yours.
Much appreciated!
Huy Tran
Full Access Member
Tensioners are NOT ONE-TIME USE!!!!
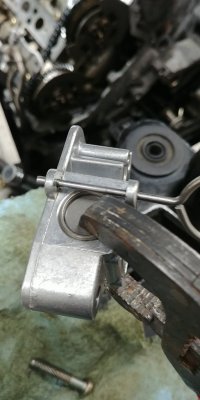
So I played with the old tensioners a little. Was going to cut them up for $h*! and giggles... Was really out of curiosity. Pressesd them down with some pliers and felt the ratcheting mechanism click and as it went down and lock along the way. Kept going until it was flush with the outer cylinder. Now if you press further pass flush, it'll click again and disengage and allow the inner cylinder to spring ALL THE WAY UP AGAIN!
So put it all back together. Re-inserted the pin. Pressed the inner cylinder all the way down and let it go.
Re-installed in the car to test. Pull the pin, and Voila! Pooped against the guide and provided tension.
I've come some videos of the process I can upload if anyone is interested.
Saved $350!
So I played with the old tensioners a little. Was going to cut them up for $h*! and giggles... Was really out of curiosity. Pressesd them down with some pliers and felt the ratcheting mechanism click and as it went down and lock along the way. Kept going until it was flush with the outer cylinder. Now if you press further pass flush, it'll click again and disengage and allow the inner cylinder to spring ALL THE WAY UP AGAIN!
So put it all back together. Re-inserted the pin. Pressed the inner cylinder all the way down and let it go.
Re-installed in the car to test. Pull the pin, and Voila! Pooped against the guide and provided tension.

I've come some videos of the process I can upload if anyone is interested.
Saved $350!
Similar threads
- Replies
- 15
- Views
- 7K

